Self-hosting AppFlowy on a Hetzner Ubuntu Server
 Yulei Chen
AppFlowy is an open-core alternative to Notion that gives you control over your data. By self-hosting AppFlowy Cloud on your own Ubuntu server, you get a workspace with AI features and real-time sync at a predictable monthly cost. The official self-hosted images used in this guide are capped at 1 user and 3 guests without a license key. If you want real multi-user collaboration with additional members, you need an AppFlowy self-hosted license.
Follow along this easy-to-understand guide to learn how you can deploy your own AppFlowy Cloud instance using Docker and Caddy web server for automatic HTTPS.
For this post, we're using an affordable server from Hetzner. Hetzner is known to provide great service at an exceptional price/performance ratio, making it an excellent choice for hosting AppFlowy.
Prerequisites
Before we start, make sure you have a Hetzner Cloud account (or be ready to create one).
Step 1: Setup Your Hetzner Server
If you don't have a Hetzner server yet, follow these steps to create one:
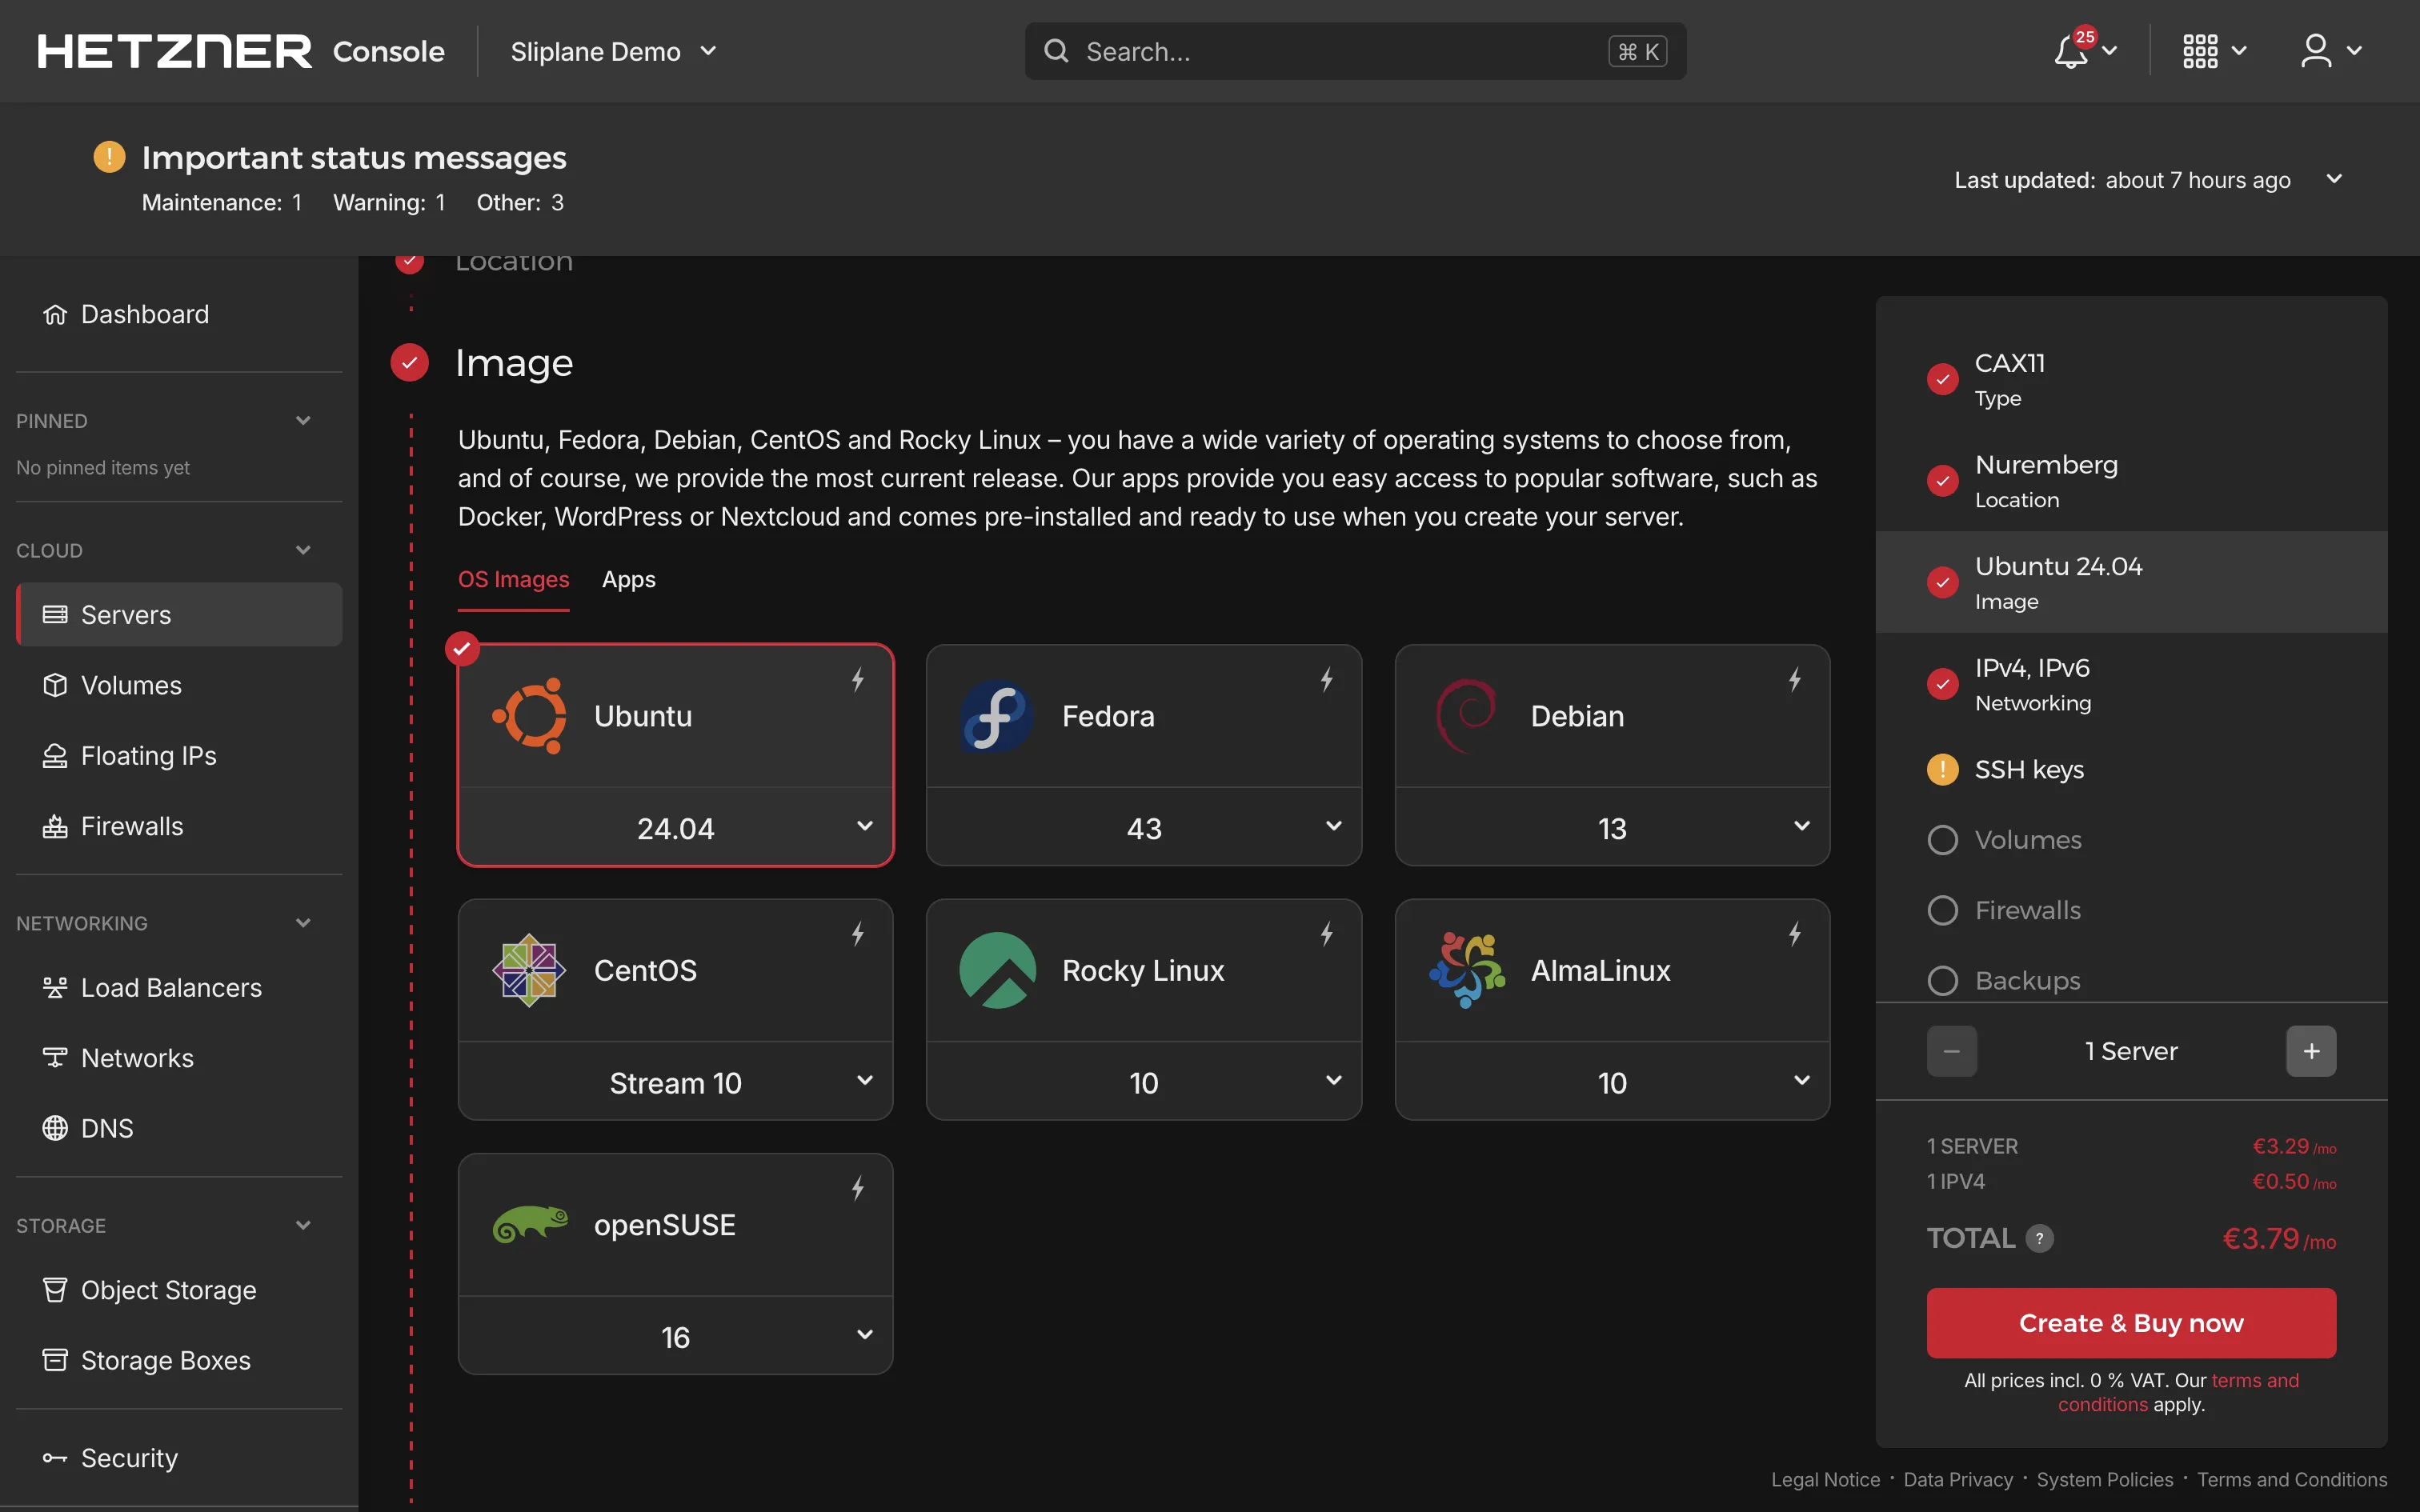
- Go to the Hetzner Cloud Console, choose a project or create a new one, then navigate to Servers → Add Server
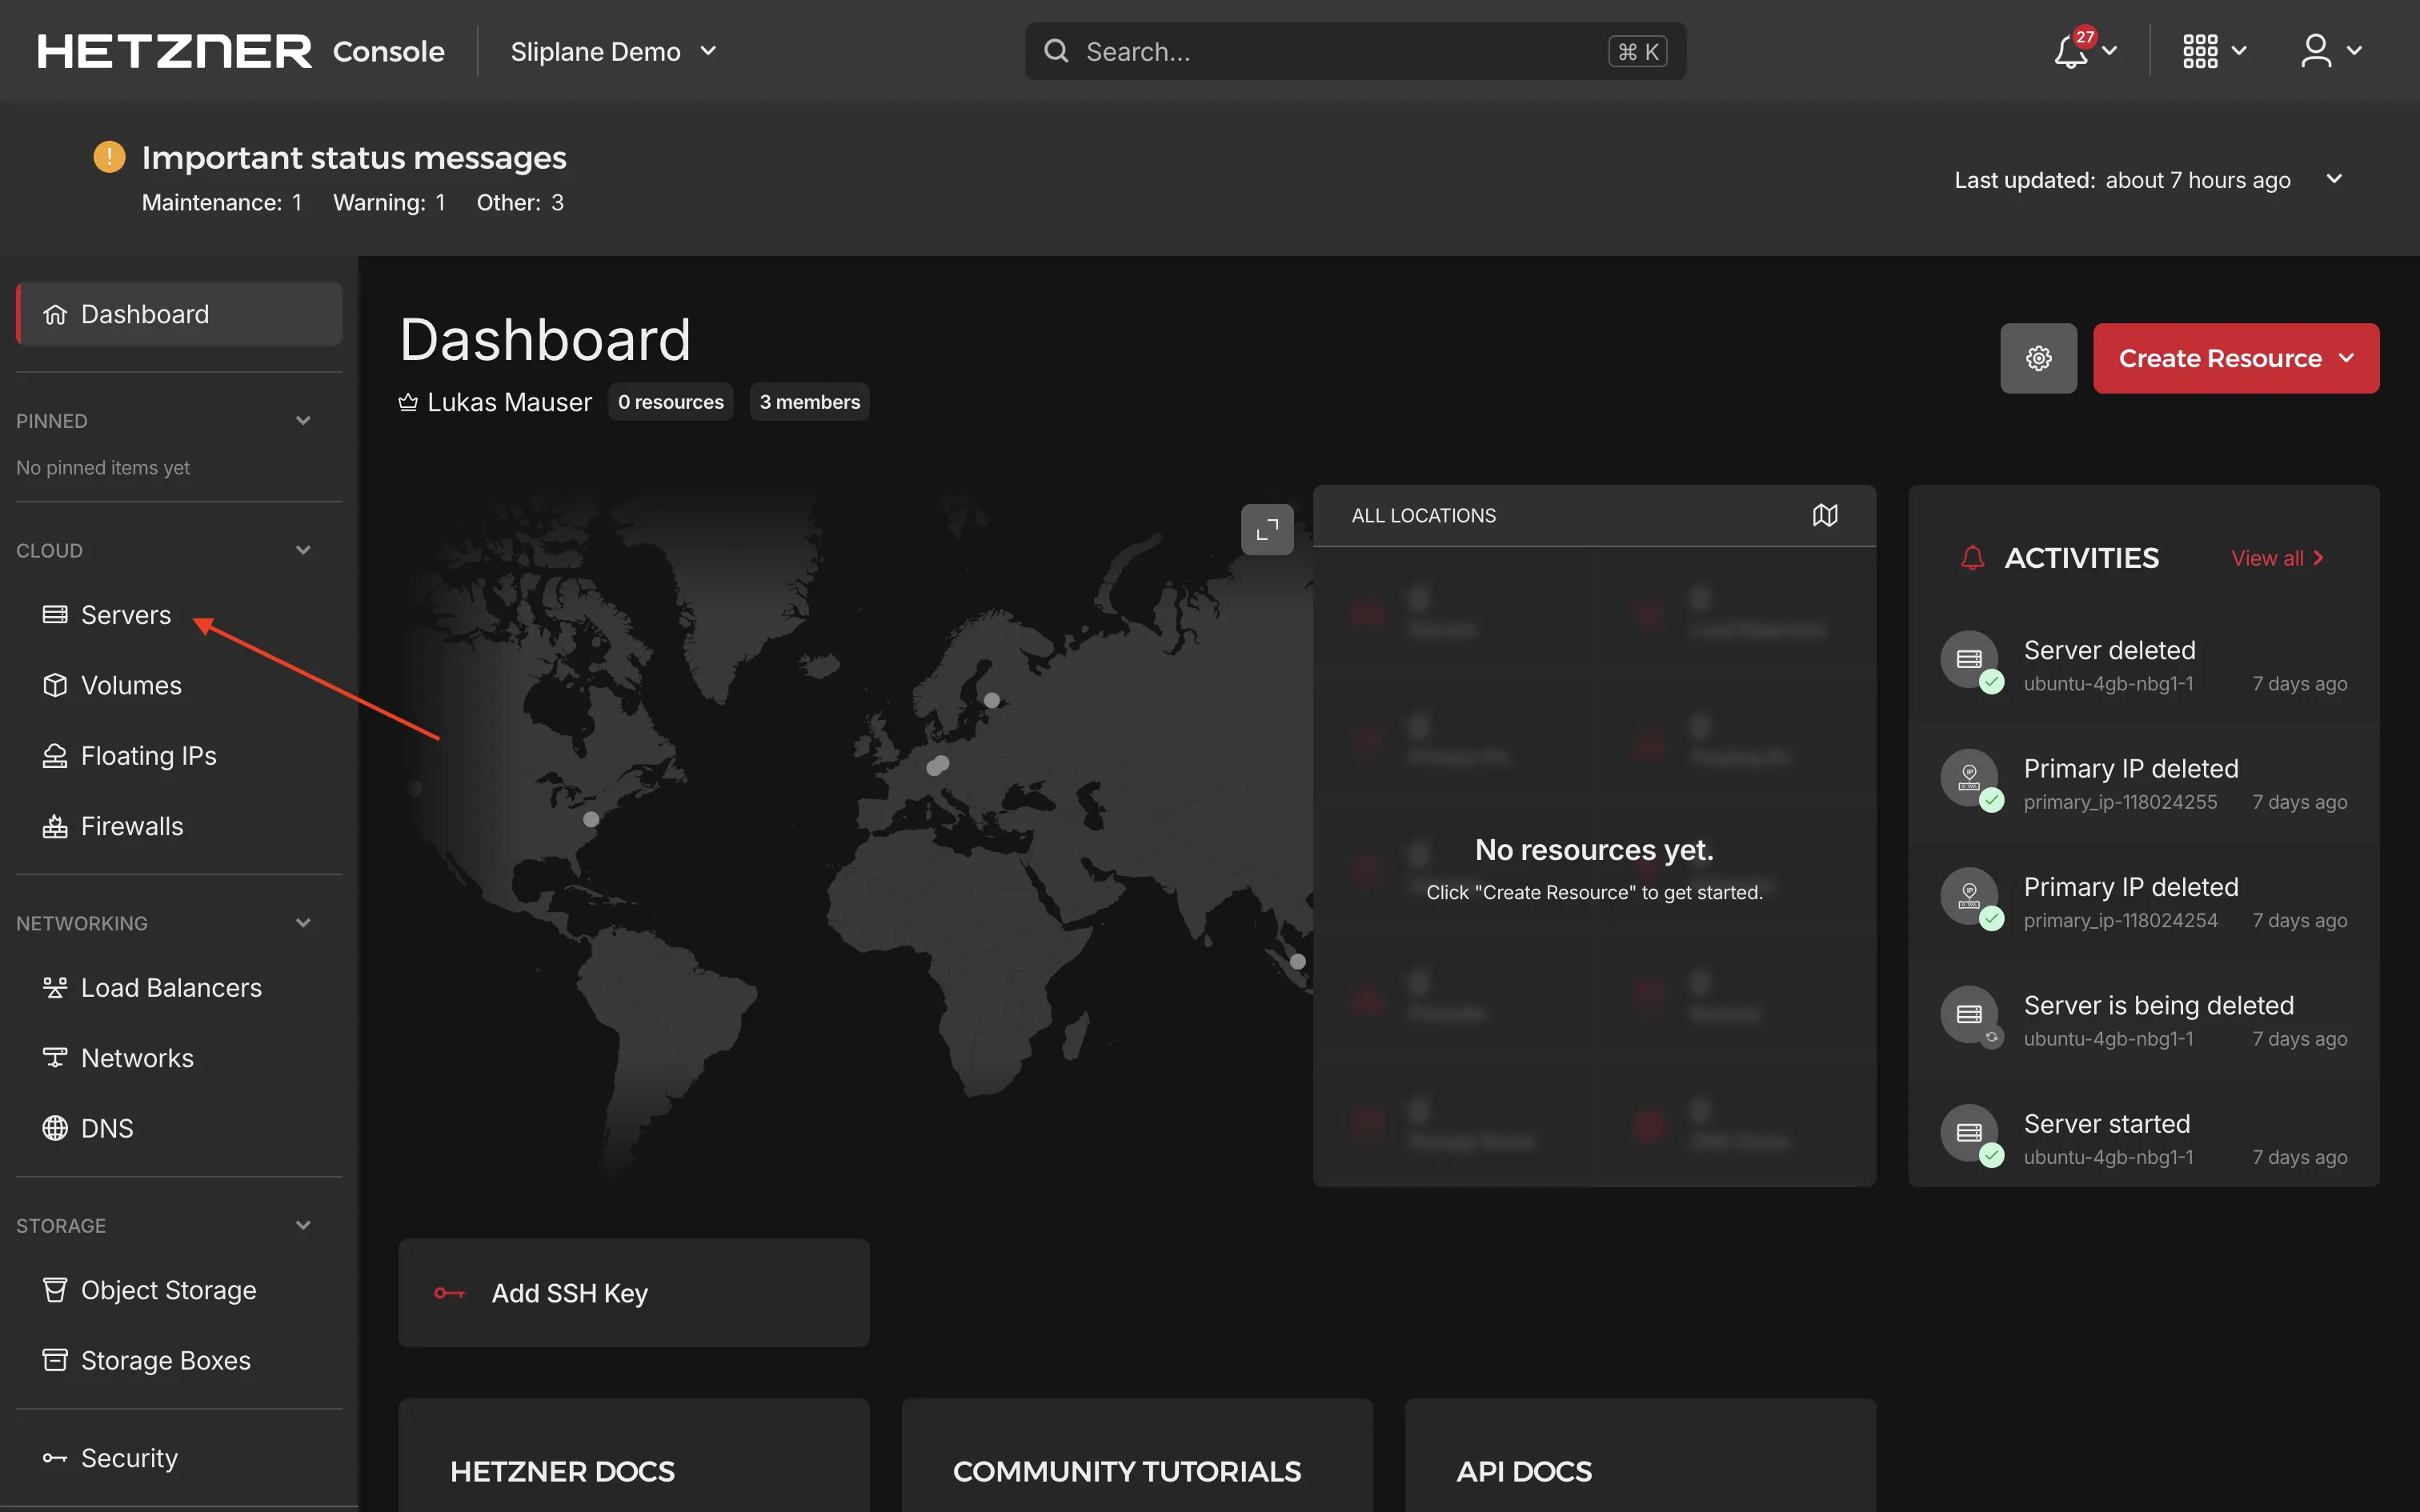
- Follow Hetzner's guidelines to choose:
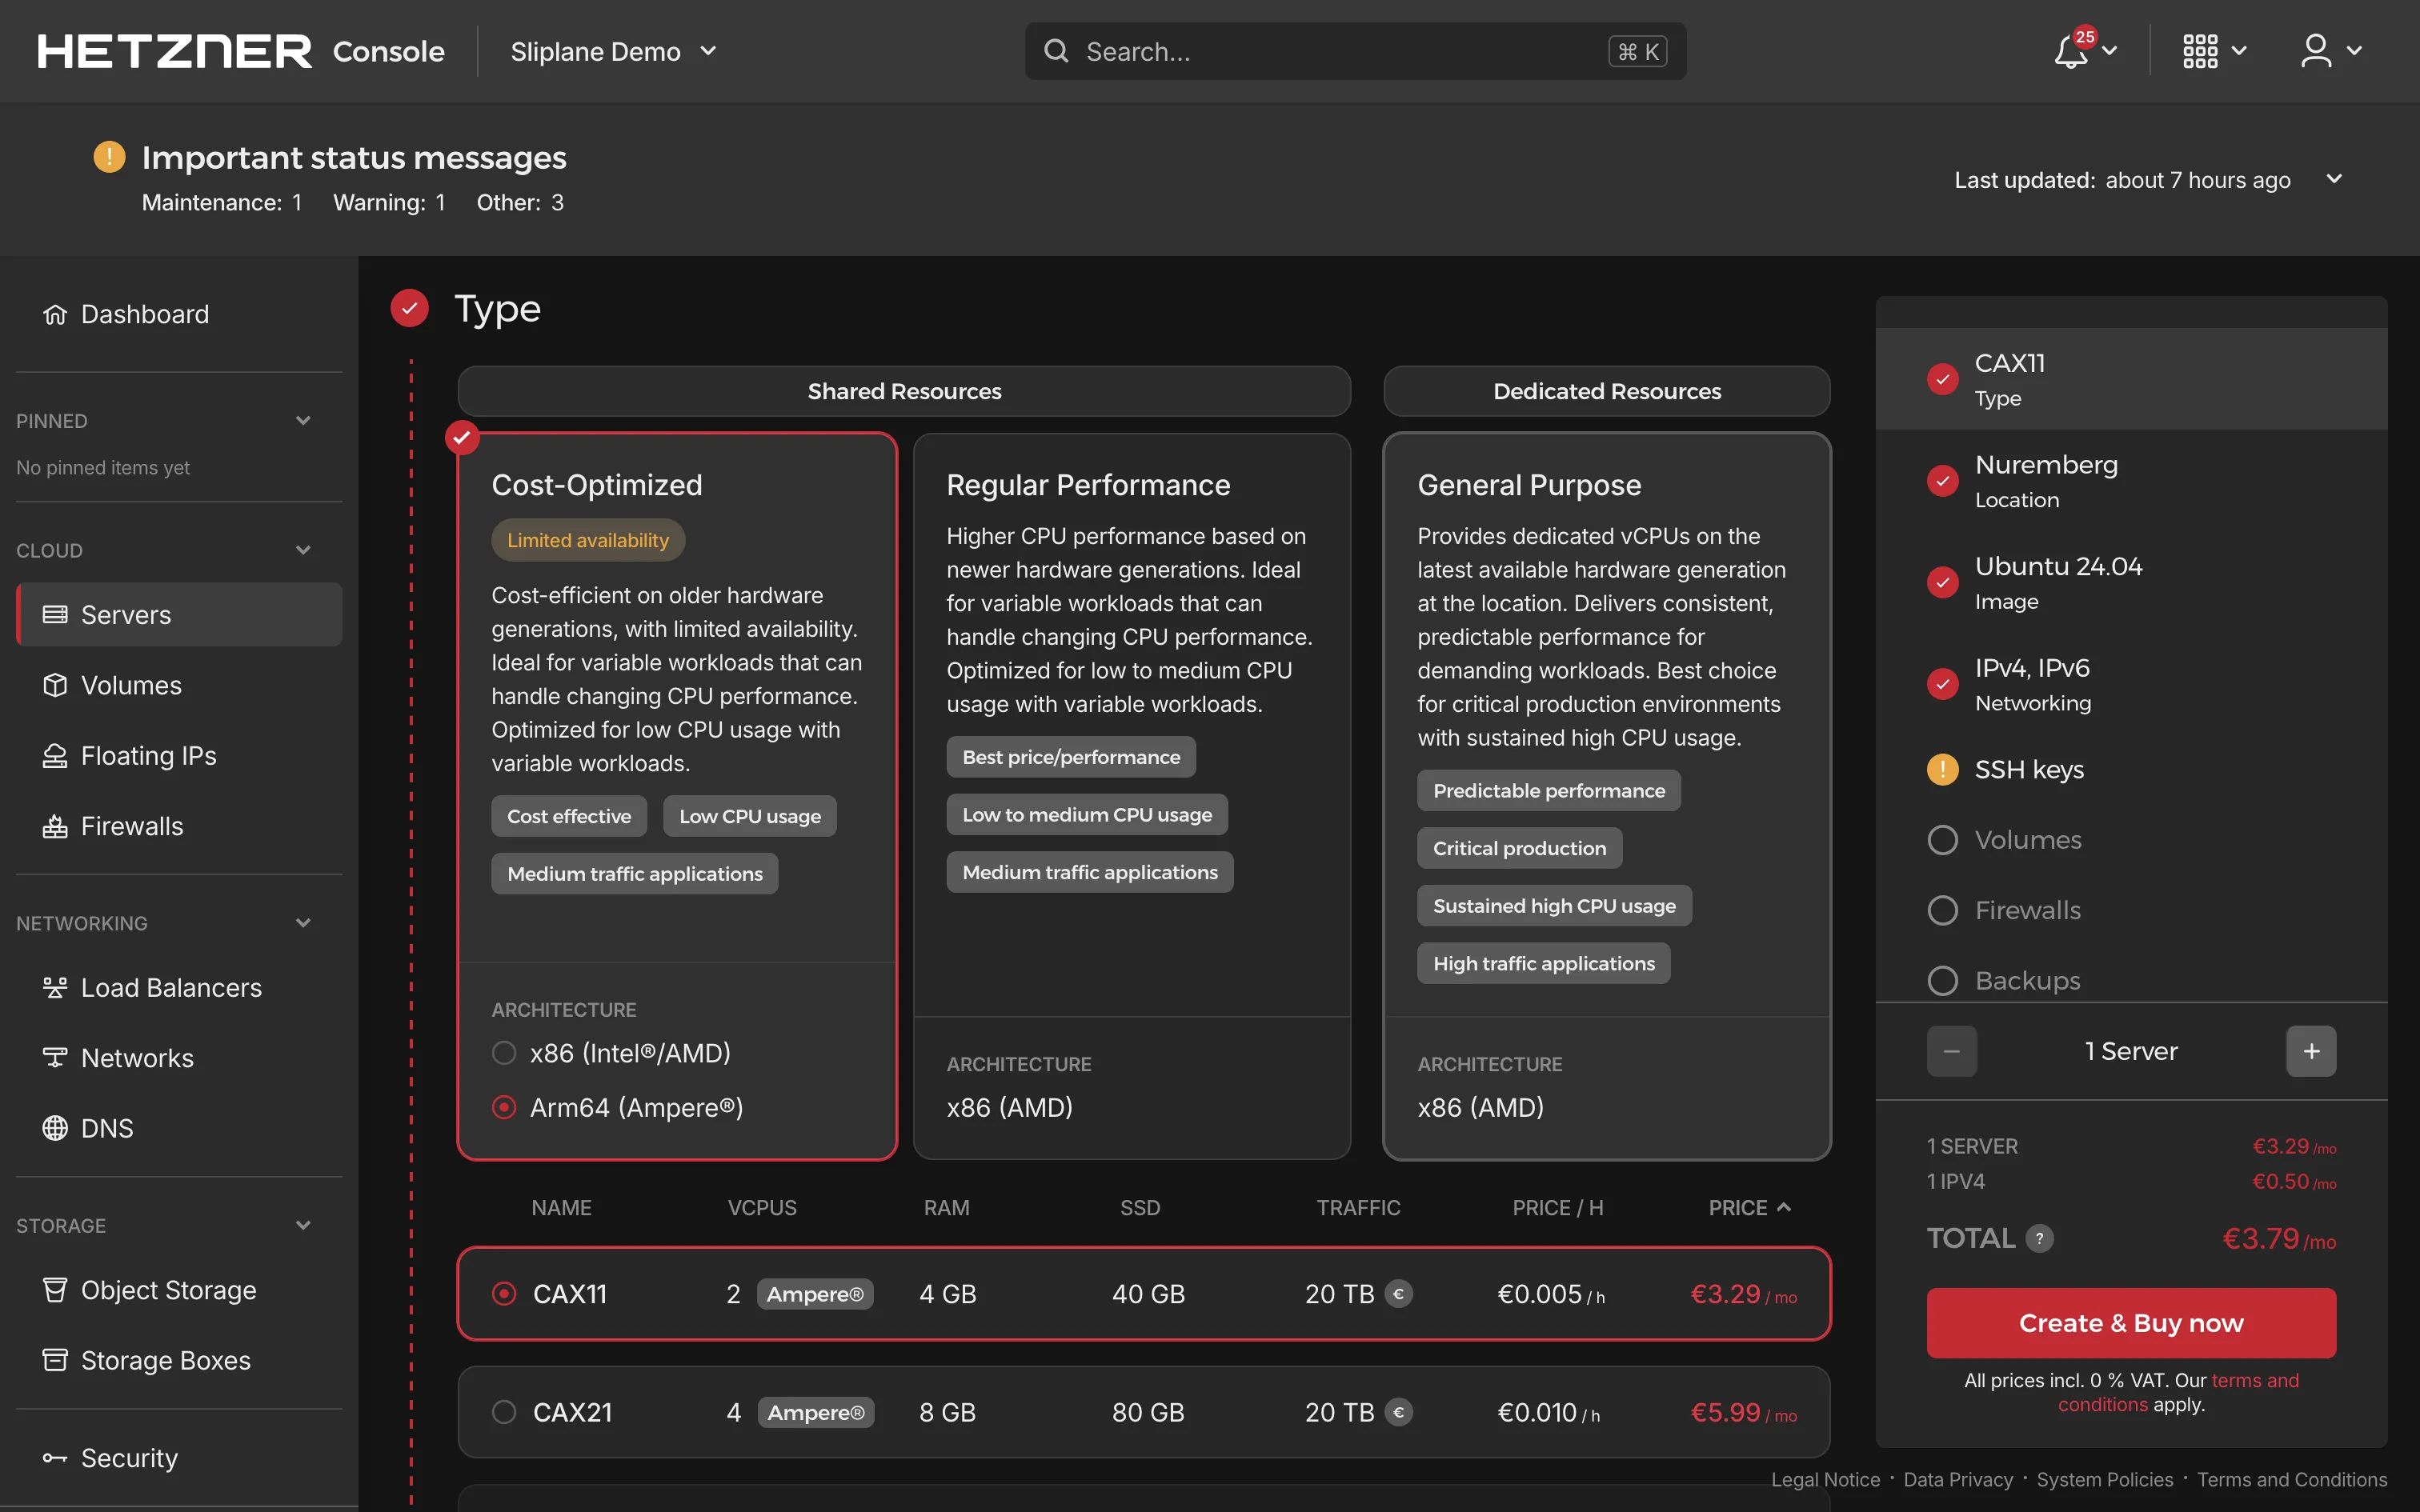
- Server type: AppFlowy Cloud runs multiple services (database, auth, object storage, and more), so you'll need at least 4 GB RAM. We recommend a CX22 or larger.
- Location: Choose a data center location closest to you or your users.
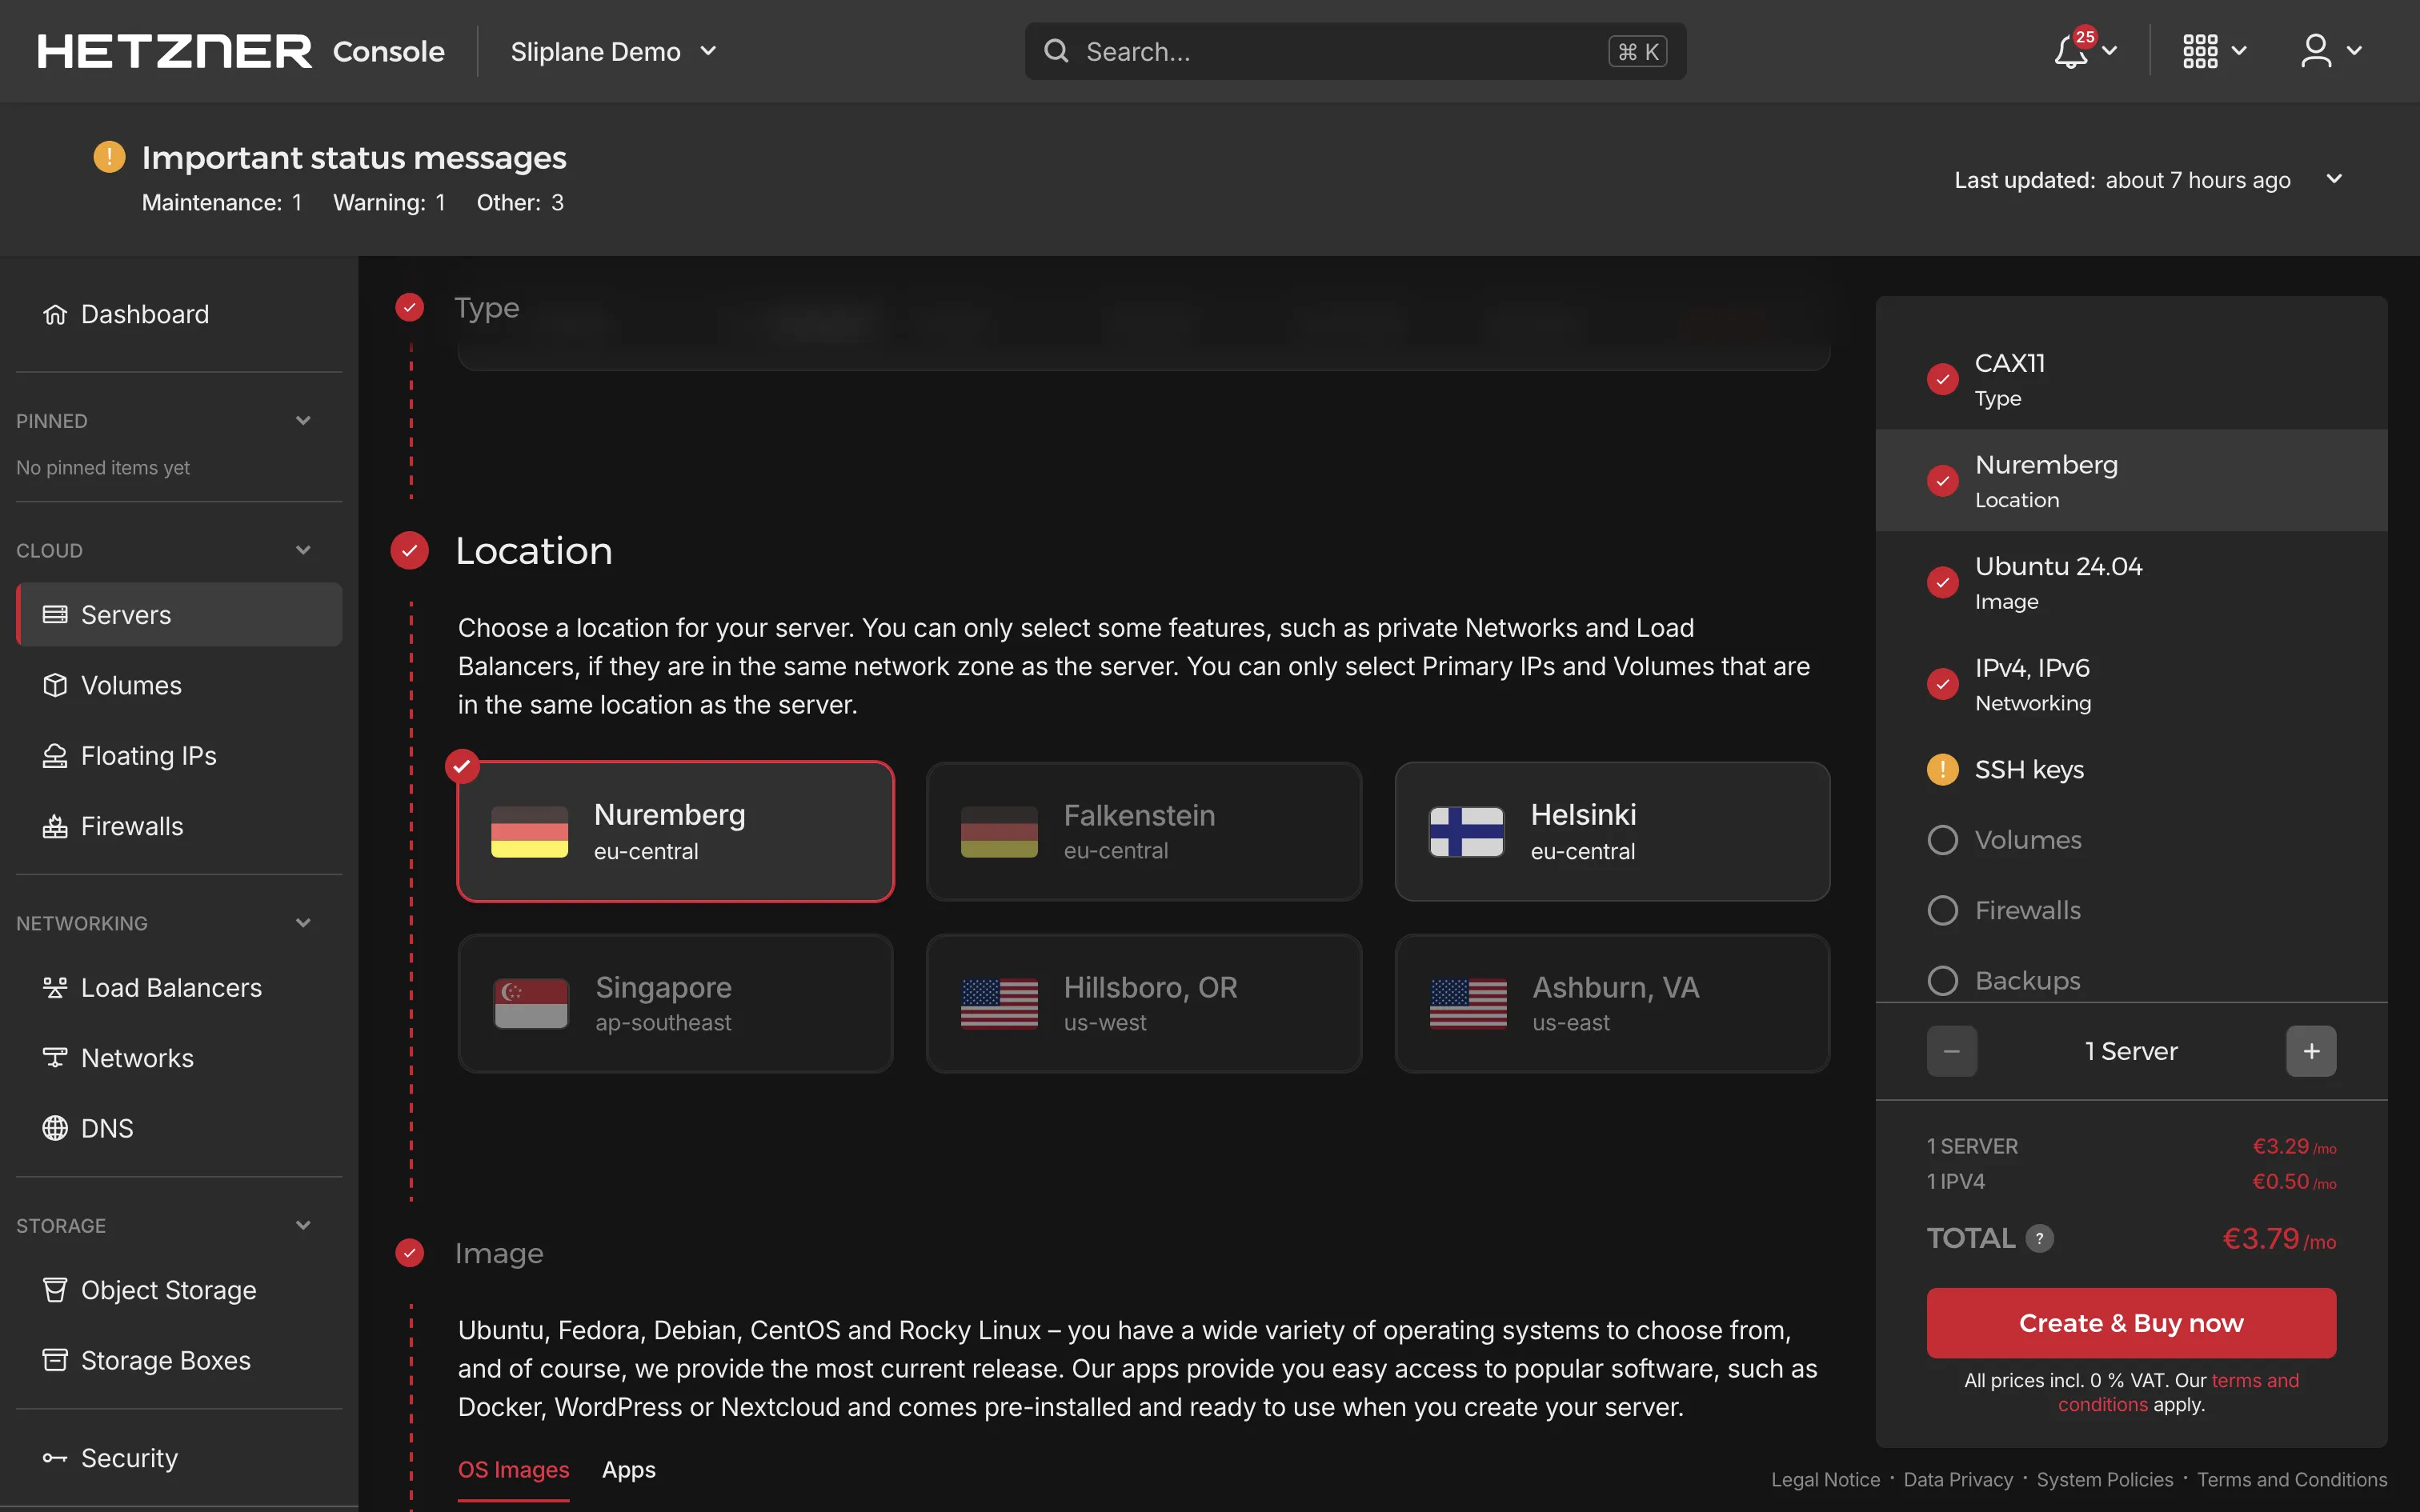
- Image: Select Ubuntu (latest LTS version recommended).
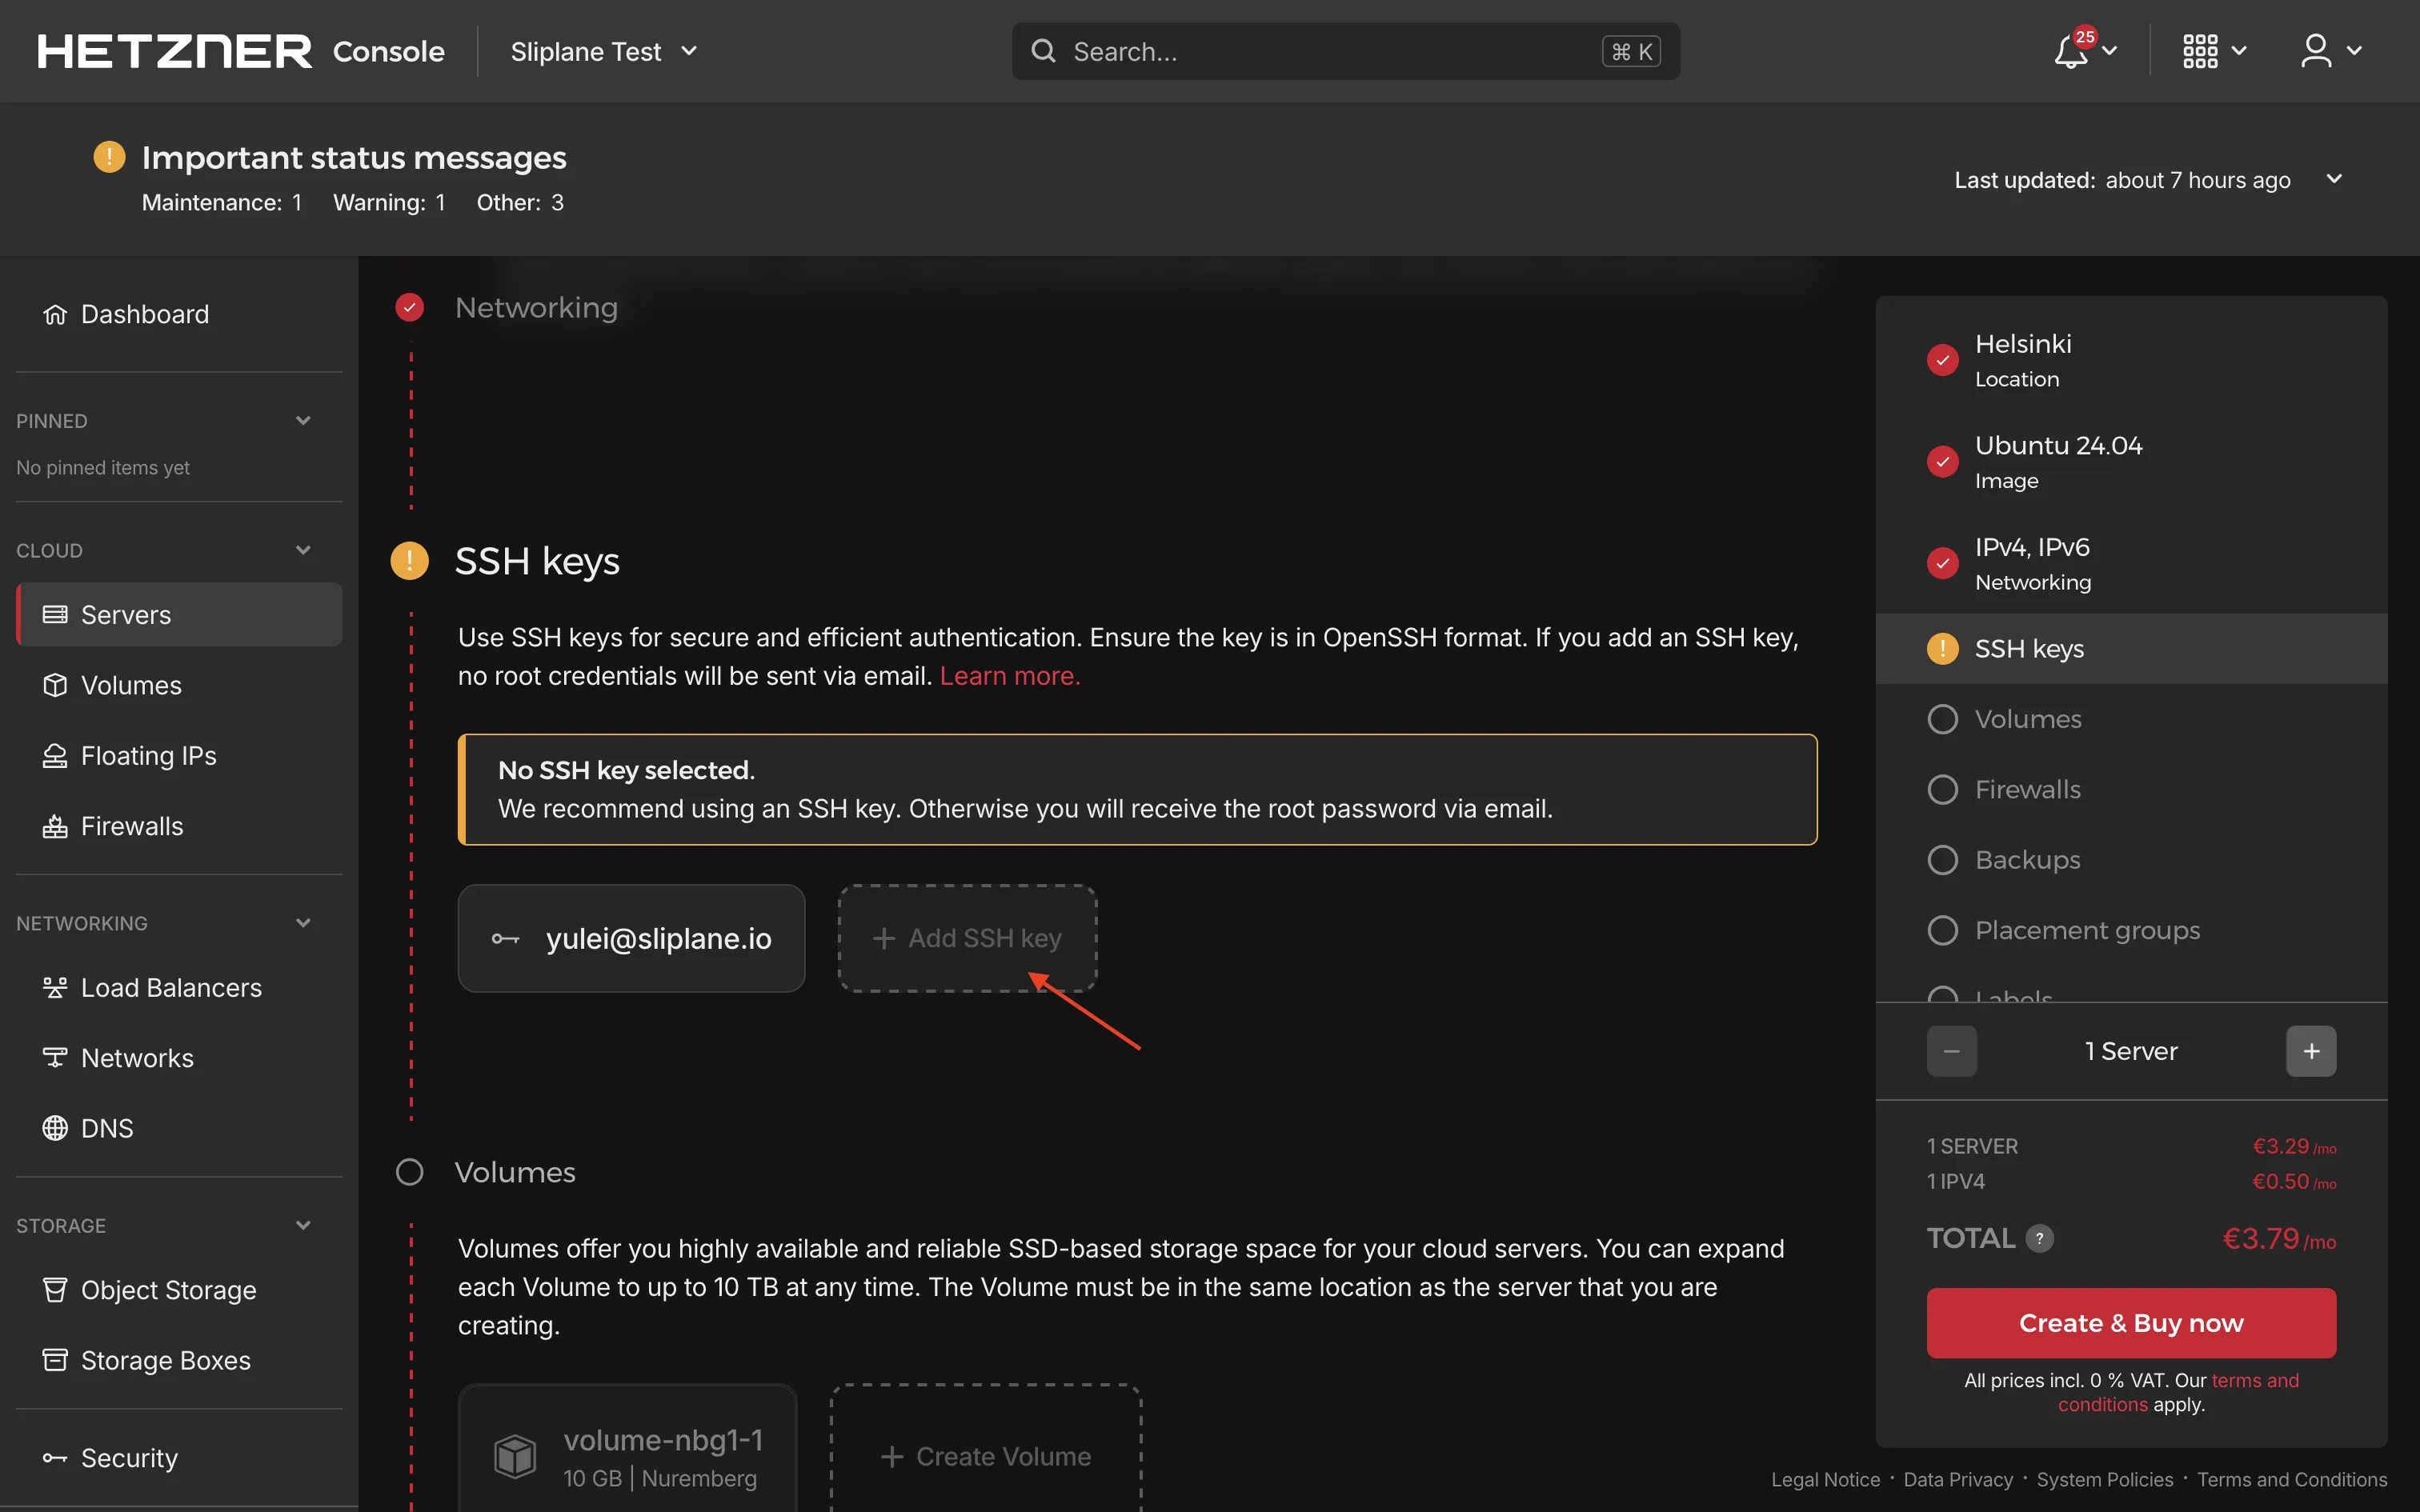
- Add SSH key: Add your SSH public key for secure access. If you don't have an SSH key yet, you can generate one using
ssh-keygen:
ssh-keygen -t ed25519 -C "your_email@example.com"
Check it out with cat ~/.ssh/id_ed25519.pub and paste it into your server.
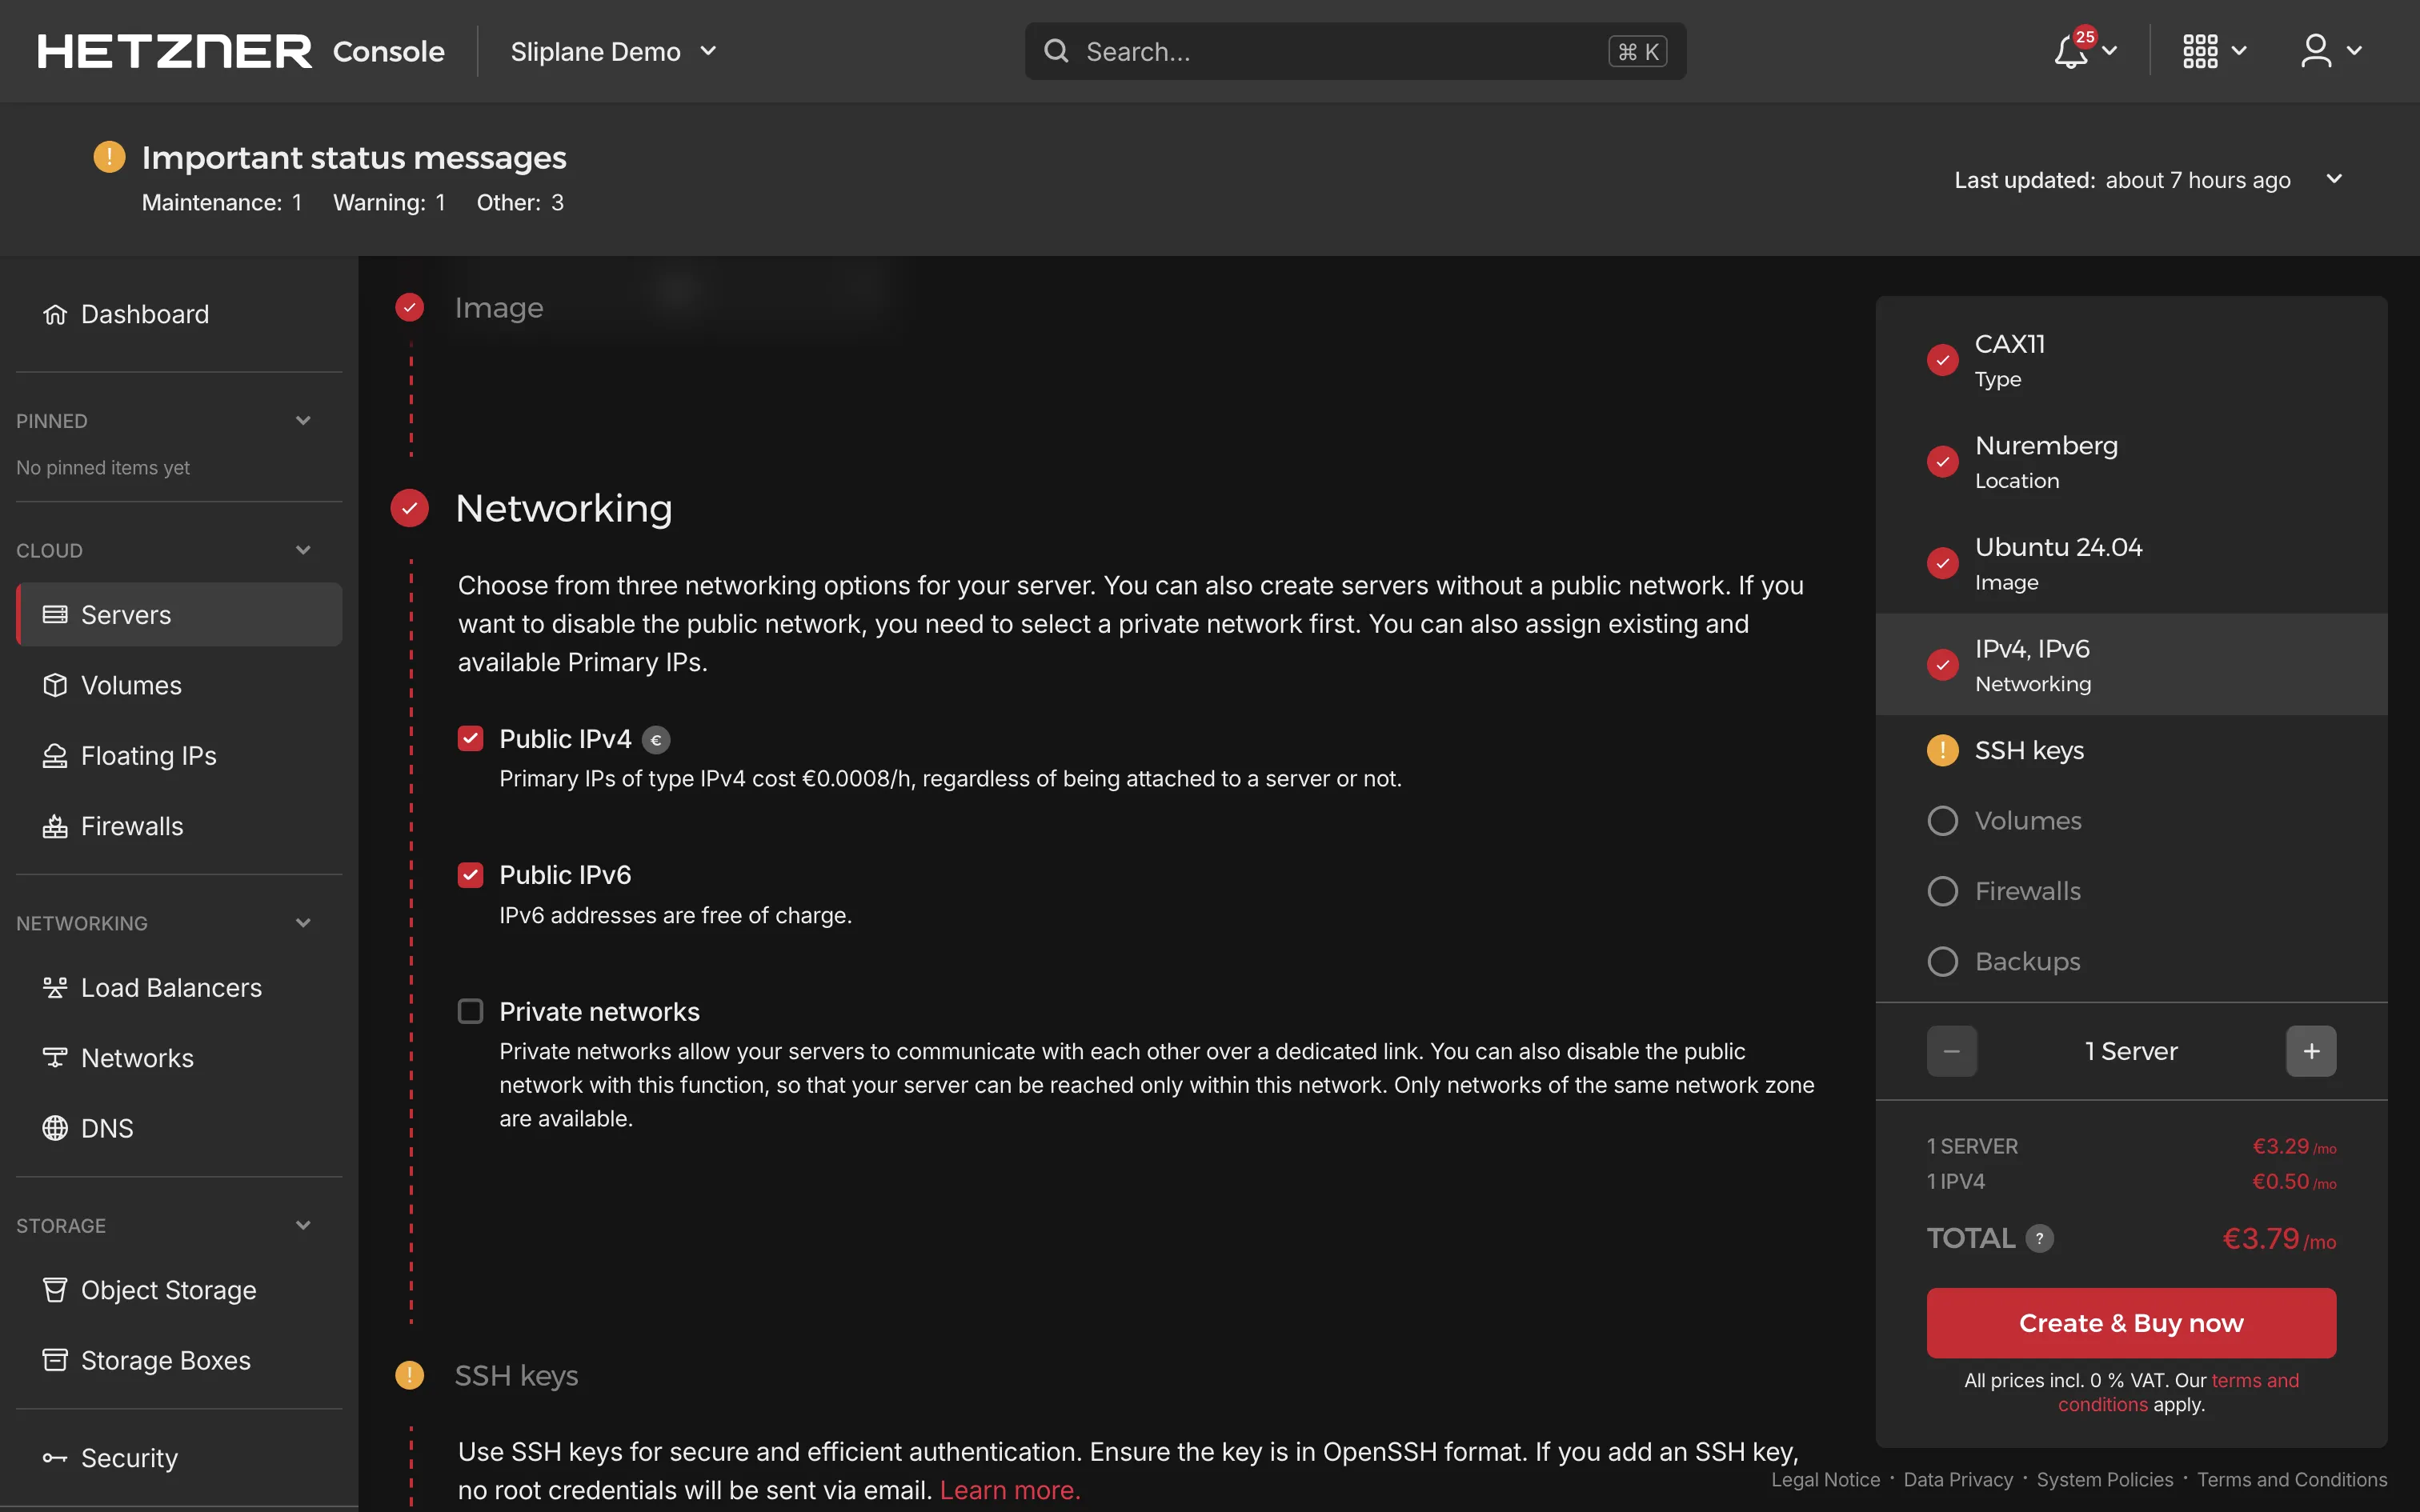
- Configure networking if needed, then click Create & Pay to provision your server
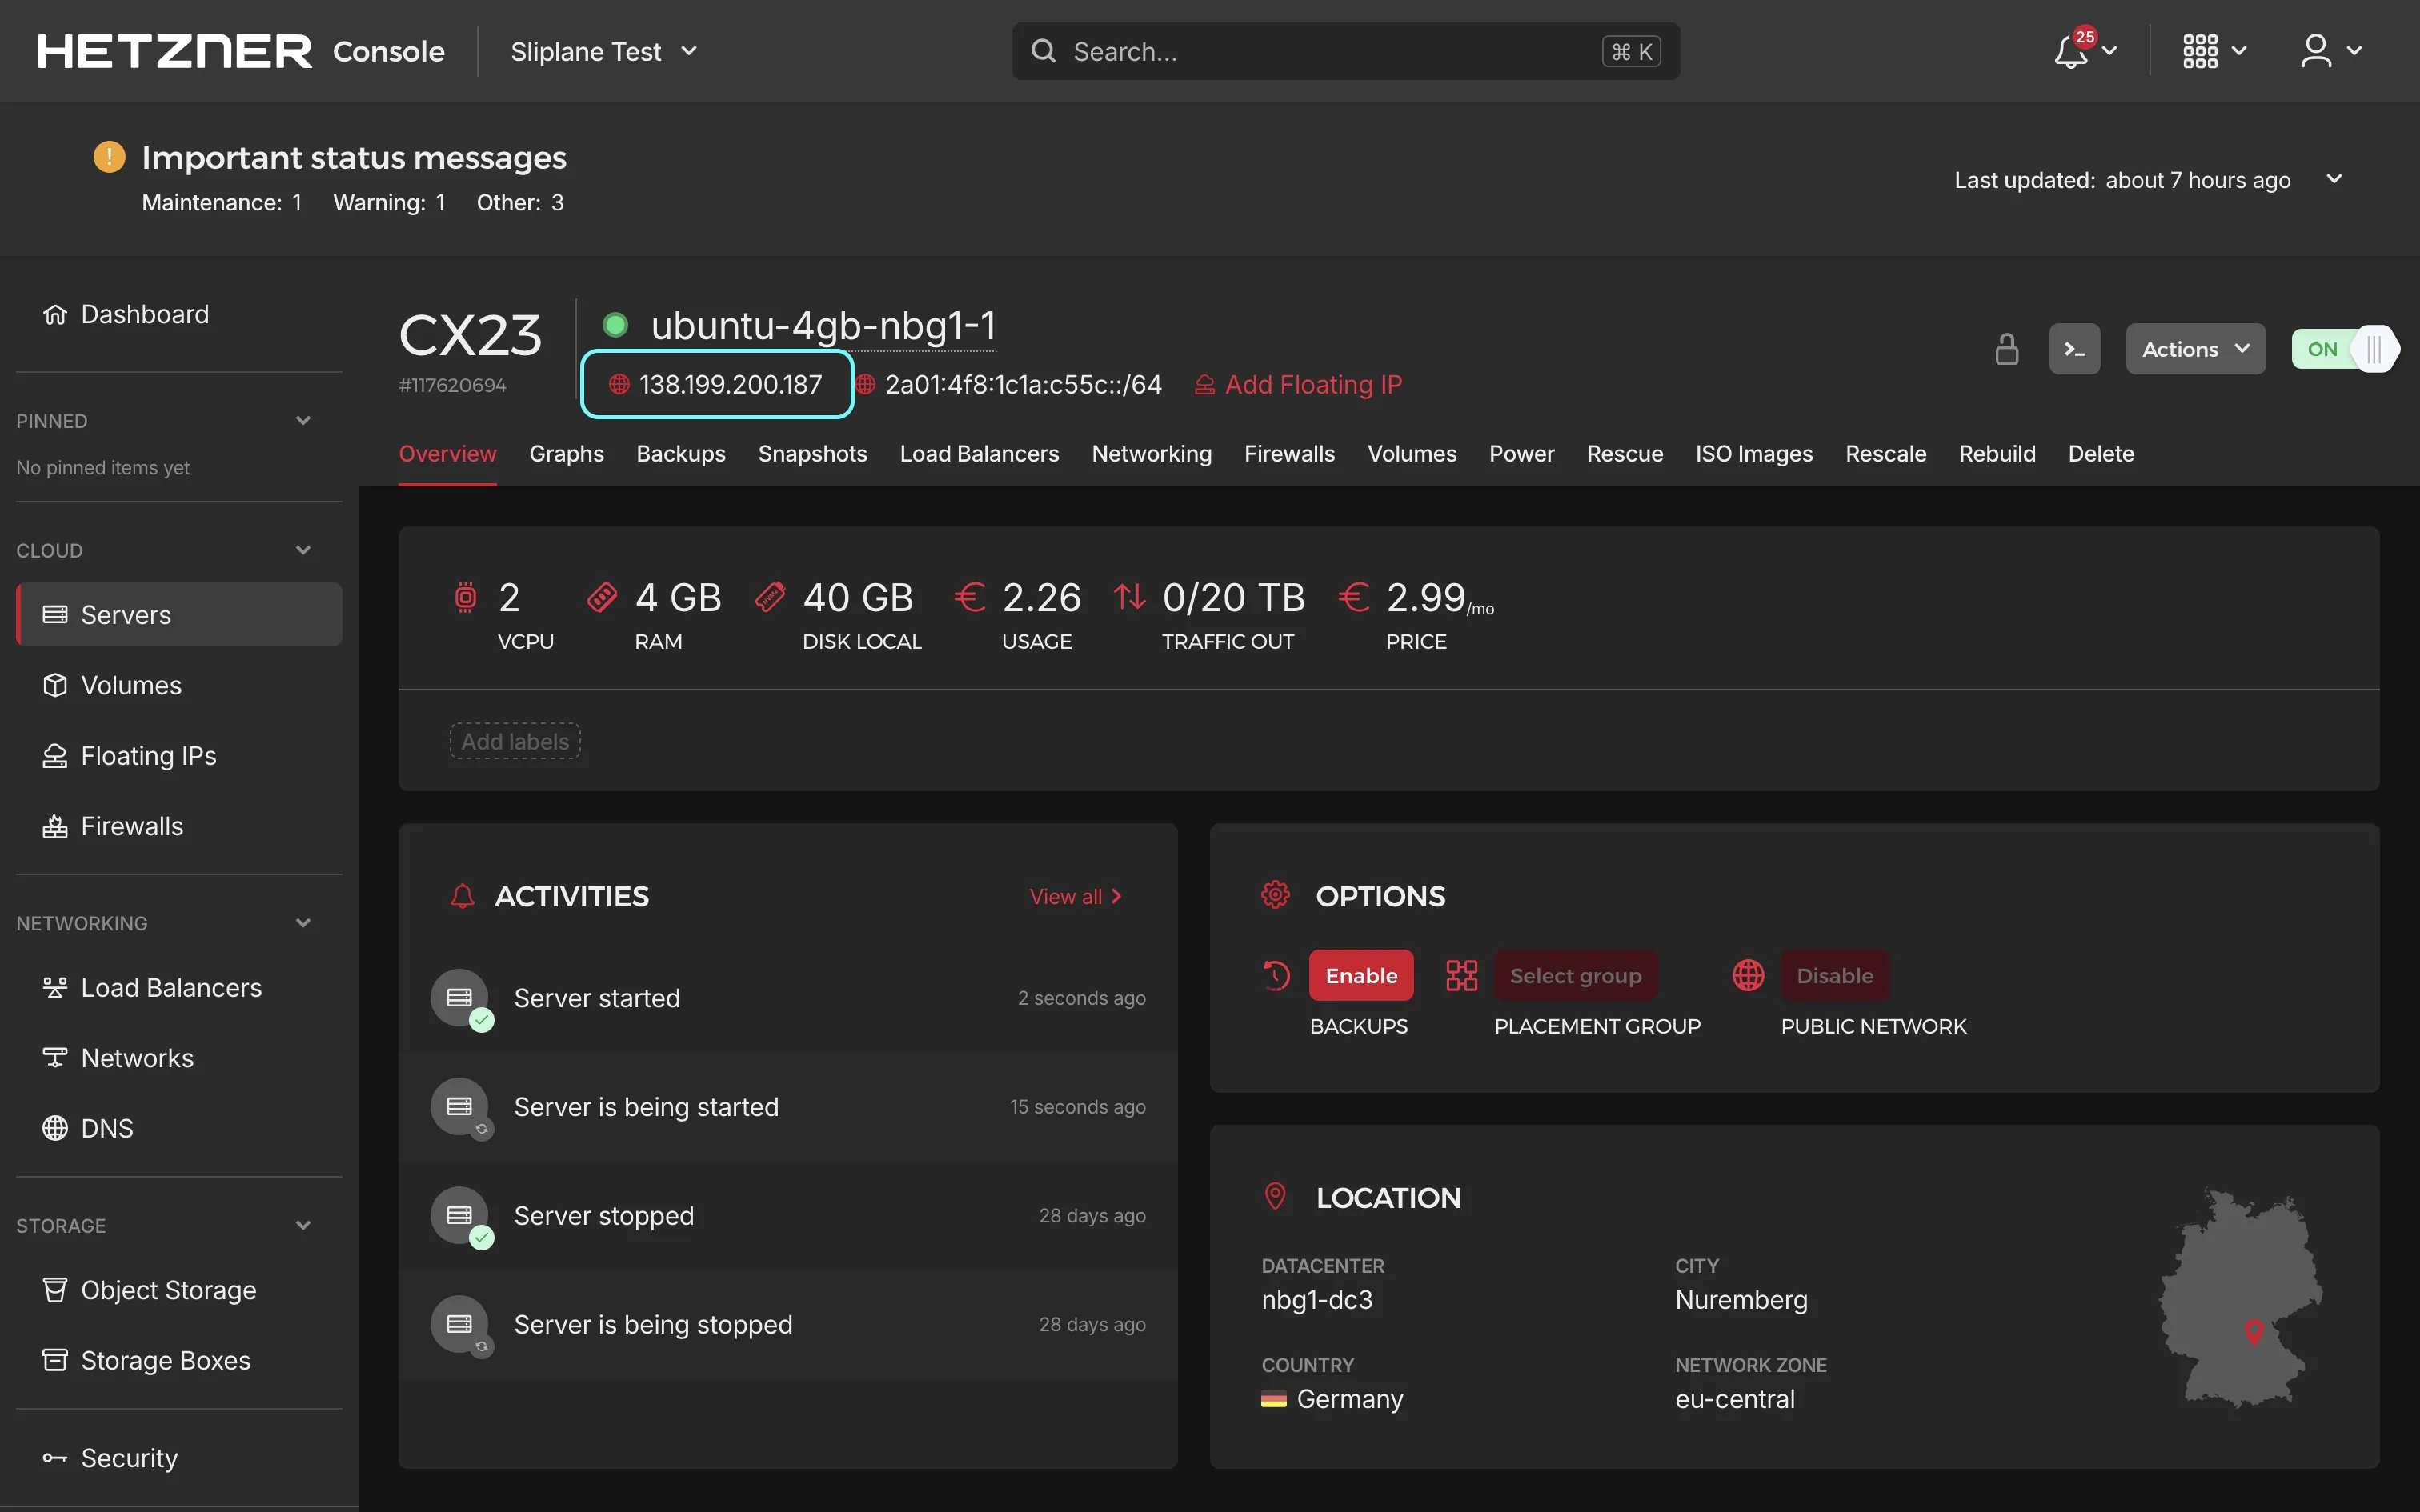
Once your server is created, note down its IP address. You'll use this to connect via SSH in the next step.
Step 2: Update Your Server
Open your terminal and log into your Ubuntu server via SSH:
ssh root@your-server-ip
and update the system to ensure it has the latest security patches and updates:
sudo apt-get update
sudo apt-get upgrade -y
Once finished, your server is ready for installing the software.
Step 3: Install and Configure UFW Firewall
Only keep necessary ports open: SSH (22), HTTP (80), HTTPS (443).
Install UFW and configure the firewall as follows:
sudo apt install ufw -y
sudo ufw allow 22    # SSH
sudo ufw allow 80    # HTTP
sudo ufw allow 443   # HTTPS
sudo ufw enable
Check your firewall configuration:
sudo ufw status verbose
Docker can sometimes ignore UFW rules. To tackle this, verify extra settings as explained here.
Step 4: Docker Installation
Docker will run AppFlowy and all its supporting services in containers. Install Docker by running these commands:
Setup dependencies and Docker's GPG key:
sudo apt-get update
sudo apt-get install ca-certificates curl gnupg

sudo install -m 0755 -d /etc/apt/keyrings
curl -fsSL https://download.docker.com/linux/ubuntu/gpg \
| sudo gpg --dearmor -o /etc/apt/keyrings/docker.gpg
sudo chmod a+r /etc/apt/keyrings/docker.gpg
Add Docker repository:
echo \
  "deb [arch=$(dpkg --print-architecture) \
signed-by=/etc/apt/keyrings/docker.gpg] \
https://download.docker.com/linux/ubuntu \
$(. /etc/os-release && echo $VERSION_CODENAME) stable" \
| sudo tee /etc/apt/sources.list.d/docker.list > /dev/null

sudo apt-get update
Install Docker Engine and compose-plugin:
sudo apt-get install docker-ce docker-ce-cli \
containerd.io docker-buildx-plugin docker-compose-plugin -y
Check installation:
sudo docker run hello-world
If you see the "hello-world" message, Docker is ready.
Step 5: Install Caddy for Automatic HTTPS
Caddy simplifies HTTPS configuration since it handles SSL certificates automatically from Let's Encrypt.
Install Caddy:
sudo apt install -y debian-keyring debian-archive-keyring apt-transport-https curl

curl -1sLf 'https://dl.cloudsmith.io/public/caddy/stable/gpg.key' \
| sudo gpg --dearmor -o /usr/share/keyrings/caddy-stable-archive-keyring.gpg

curl -1sLf 'https://dl.cloudsmith.io/public/caddy/stable/debian.deb.txt' \
| sudo tee /etc/apt/sources.list.d/caddy-stable.list

sudo apt update
sudo apt install caddy -y
Before configuring Caddy, you need to point your domain to your server's IP address. If you haven't configured DNS yet, follow these steps:
Configure DNS for Your Domain
- Log into your domain registrar's dashboard (where you purchased your domain)
- Navigate to the DNS settings or DNS management section
- Add an A record with the following settings:
- Type:
A - Name:
@(for root domain) or a subdomain likeappflowy(forappflowy.yourdomain.com) - Value/Target: Your Hetzner server's IPv4 address
- Type:
- Add an AAAA record for IPv6 support:
- Type:
AAAA - Name:
@(for root domain) or the same subdomain you used for the A record - Value/Target: Your Hetzner server's IPv6 address
- Type:
DNS changes can take a few minutes to several hours to propagate. You can check if your DNS is configured correctly using tools like dig or online DNS checkers. Once the DNS record is active, you can proceed with Caddy configuration.
Configure Caddy
Edit the Caddyfile configuration file:
sudo nano /etc/caddy/Caddyfile
Enter your domain and configure reverse proxy. Replace "yourdomain.com" with your actual domain name:
yourdomain.com {
    reverse_proxy localhost:8080
}
If no domain yet, use this temporarily:
:80 {
    reverse_proxy localhost:8080
}
Restart Caddy to load the config:
sudo systemctl restart caddy
Step 6: Run AppFlowy with Docker Compose
AppFlowy Cloud consists of multiple services: the main API server, authentication (GoTrue), an admin panel, a background worker, AI service, PostgreSQL with pgvector, Redis, MinIO for object storage, and an Nginx reverse proxy that ties them together.
First, create a directory for AppFlowy and the nginx config:
mkdir -p /opt/appflowy/nginx
cd /opt/appflowy
Create the Environment File
Generate strong passwords for the services:
openssl rand -base64 32
Run this command multiple times to get unique passwords for each field below.
Create the .env file:
sudo nano /opt/appflowy/.env
Paste the following content and replace all CHANGE_ME_... values with your generated passwords:
# AppFlowy Base URL (your domain with https, no trailing slash)
APPFLOWY_BASE_URL=https://yourdomain.com

# PostgreSQL
POSTGRES_USER=appflowy
POSTGRES_PASSWORD=CHANGE_ME_POSTGRES_PASSWORD
POSTGRES_DB=appflowy

# MinIO Object Storage
MINIO_USER=minioadmin
MINIO_PASSWORD=CHANGE_ME_MINIO_PASSWORD

# JWT Secret (generate with: openssl rand -base64 32)
JWT_SECRET=CHANGE_ME_JWT_SECRET

# GoTrue Admin Credentials
ADMIN_EMAIL=admin@example.com
ADMIN_PASSWORD=CHANGE_ME_ADMIN_PASSWORD

# SMTP Settings (optional — needed for email invitations)
SMTP_HOST=
SMTP_PORT=587
SMTP_USER=
SMTP_PASS=
SMTP_ADMIN_EMAIL=

# OpenAI API Key (optional — needed for AI features)
OPENAI_API_KEY=
Make sure you replace every CHANGE_ME_... placeholder with a strong, unique password. Reusing passwords across services is a security risk.
Create the Nginx Config
The built-in Nginx service routes traffic to the correct AppFlowy backend services.
sudo nano /opt/appflowy/nginx/nginx.conf
Paste the following config:
error_log  /var/log/nginx/error.log notice;
pid        /var/run/nginx.pid;

events {
    worker_connections  1024;
}

http {
    resolver 127.0.0.11 valid=10s;
    map $http_upgrade $connection_upgrade {
        default upgrade;
        '' close;
    }

    server {
        listen 80;
        client_max_body_size 10M;
        underscores_in_headers on;

        set $appflowy_cloud_backend "http://appflowy_cloud:8000";
        set $gotrue_backend "http://gotrue:9999";
        set $admin_frontend_backend "http://admin_frontend:3000";

        # GoTrue Authentication
        location /gotrue/ {
            proxy_pass $gotrue_backend;
            rewrite ^/gotrue(/.*)$ $1 break;
            proxy_set_header Host $http_host;
            proxy_pass_request_headers on;
        }

        # WebSocket endpoint
        location /ws {
            proxy_pass $appflowy_cloud_backend;
            proxy_http_version 1.1;
            proxy_set_header Upgrade $http_upgrade;
            proxy_set_header Connection "Upgrade";
            proxy_set_header Host $host;
            proxy_set_header X-Real-IP $remote_addr;
            proxy_set_header X-Forwarded-For $proxy_add_x_forwarded_for;
            proxy_set_header X-Forwarded-Proto $scheme;
            proxy_read_timeout 86400s;
        }

        # API endpoints
        location /api {
            proxy_pass $appflowy_cloud_backend;
            proxy_set_header X-Request-Id $request_id;
            proxy_set_header Host $http_host;

            # Publish endpoint (large uploads)
            location ~* ^/api/workspace/([a-zA-Z0-9_-]+)/publish$ {
                proxy_pass $appflowy_cloud_backend;
                proxy_request_buffering off;
                client_max_body_size 256M;
            }

            # Chat endpoint (streaming)
            location /api/chat {
                proxy_pass $appflowy_cloud_backend;
                proxy_http_version 1.1;
                proxy_set_header Connection "";
                chunked_transfer_encoding on;
                proxy_buffering off;
                proxy_cache off;
                proxy_read_timeout 600s;
                proxy_connect_timeout 600s;
                proxy_send_timeout 600s;
            }

            # Import endpoint (very large uploads)
            location /api/import {
                proxy_pass $appflowy_cloud_backend;
                proxy_set_header X-Request-Id $request_id;
                proxy_set_header Host $http_host;
                proxy_read_timeout 600s;
                proxy_connect_timeout 600s;
                proxy_send_timeout 600s;
                proxy_request_buffering off;
                proxy_buffering off;
                proxy_cache off;
                client_max_body_size 2G;
            }
        }

        # Admin Frontend
        location /console {
            proxy_pass $admin_frontend_backend;
            proxy_set_header X-Scheme $scheme;
            proxy_set_header Host $host;
            proxy_set_header X-Real-IP $remote_addr;
            proxy_set_header X-Forwarded-For $proxy_add_x_forwarded_for;
            proxy_set_header X-Forwarded-Proto $scheme;
            proxy_http_version 1.1;
            proxy_set_header Connection "";
            proxy_buffering off;
            proxy_cache off;
            proxy_read_timeout 60s;
            proxy_connect_timeout 60s;
            proxy_send_timeout 60s;
        }

        # Redirect root to admin console
        location = / {
            return 301 /console;
        }

        # Health check
        location /health {
            access_log off;
            return 200 "healthy\n";
            add_header Content-Type text/plain;
        }
    }
}
Create the Docker Compose File
sudo nano /opt/appflowy/compose.yml
Paste the following content:
services:
  nginx:
    image: nginx:1.29.2
    restart: unless-stopped
    ports:
      - "8080:80"
    volumes:
      - ./nginx/nginx.conf:/etc/nginx/nginx.conf:ro
    depends_on:
      - appflowy_cloud
      - gotrue
      - admin_frontend
    healthcheck:
      test: ["CMD", "curl", "-f", "http://localhost/health"]
      interval: 30s
      timeout: 10s
      retries: 3
      start_period: 40s

  appflowy_cloud:
    image: appflowyinc/appflowy_cloud:0.9.149
    restart: unless-stopped
    environment:
      - RUST_LOG=info
      - APPFLOWY_BASE_URL=${APPFLOWY_BASE_URL}
      - APPFLOWY_ENVIRONMENT=production
      - APPFLOWY_DATABASE_URL=postgres://${POSTGRES_USER}:${POSTGRES_PASSWORD}@postgres:5432/${POSTGRES_DB}
      - APPFLOWY_REDIS_URI=redis://redis:6379
      - APPFLOWY_GOTRUE_JWT_SECRET=${JWT_SECRET}
      - APPFLOWY_GOTRUE_BASE_URL=http://gotrue:9999
      - APPFLOWY_S3_CREATE_BUCKET=true
      - APPFLOWY_S3_USE_MINIO=true
      - APPFLOWY_S3_MINIO_URL=http://minio:9000
      - APPFLOWY_S3_ACCESS_KEY=${MINIO_USER}
      - APPFLOWY_S3_SECRET_KEY=${MINIO_PASSWORD}
      - APPFLOWY_S3_BUCKET=appflowy
      - APPFLOWY_S3_REGION=us-east-1
      - APPFLOWY_MAILER_SMTP_HOST=${SMTP_HOST:-smtp.gmail.com}
      - APPFLOWY_MAILER_SMTP_PORT=${SMTP_PORT:-587}
      - APPFLOWY_MAILER_SMTP_USERNAME=${SMTP_USER:-notify@appflowy.io}
      - APPFLOWY_MAILER_SMTP_EMAIL=${SMTP_USER:-notify@appflowy.io}
      - APPFLOWY_MAILER_SMTP_PASSWORD=${SMTP_PASS:-email_sender_password}
      - APPFLOWY_MAILER_SMTP_TLS_KIND=none
      - APPFLOWY_ACCESS_CONTROL=true
      - APPFLOWY_DATABASE_MAX_CONNECTIONS=40
      - AI_SERVER_HOST=ai
      - AI_SERVER_PORT=5001
      - AI_OPENAI_API_KEY=${OPENAI_API_KEY:-}
      - APPFLOWY_WEB_URL=http://appflowy_web:3000
    healthcheck:
      test: "curl --fail http://127.0.0.1:8000/api/health || exit 1"
      interval: 5s
      timeout: 5s
      retries: 12
    depends_on:
      gotrue:
        condition: service_healthy
      postgres:
        condition: service_healthy
      redis:
        condition: service_started

  gotrue:
    image: appflowyinc/gotrue:0.9.149
    restart: unless-stopped
    environment:
      - GOTRUE_API_HOST=0.0.0.0
      - GOTRUE_API_PORT=9999
      - PORT=9999
      - GOTRUE_ADMIN_EMAIL=${ADMIN_EMAIL:-admin@example.com}
      - GOTRUE_ADMIN_PASSWORD=${ADMIN_PASSWORD}
      - GOTRUE_DISABLE_SIGNUP=false
      - GOTRUE_SITE_URL=appflowy-flutter://
      - GOTRUE_URI_ALLOW_LIST=**
      - GOTRUE_JWT_SECRET=${JWT_SECRET}
      - GOTRUE_JWT_EXP=7200
      - GOTRUE_DB_DRIVER=postgres
      - API_EXTERNAL_URL=${APPFLOWY_BASE_URL}/gotrue
      - DATABASE_URL=postgres://${POSTGRES_USER}:${POSTGRES_PASSWORD}@postgres:5432/${POSTGRES_DB}?search_path=auth
      - GOTRUE_SMTP_HOST=${SMTP_HOST}
      - GOTRUE_SMTP_PORT=${SMTP_PORT:-587}
      - GOTRUE_SMTP_USER=${SMTP_USER}
      - GOTRUE_SMTP_PASS=${SMTP_PASS}
      - GOTRUE_MAILER_URLPATHS_CONFIRMATION=/verify
      - GOTRUE_MAILER_URLPATHS_INVITE=/verify
      - GOTRUE_MAILER_URLPATHS_RECOVERY=/verify
      - GOTRUE_MAILER_URLPATHS_EMAIL_CHANGE=/verify
      - GOTRUE_SMTP_ADMIN_EMAIL=${SMTP_ADMIN_EMAIL}
      - GOTRUE_SMTP_MAX_FREQUENCY=1ns
      - GOTRUE_RATE_LIMIT_EMAIL_SENT=100
      - GOTRUE_MAILER_AUTOCONFIRM=true
    depends_on:
      postgres:
        condition: service_healthy
    healthcheck:
      test: "curl --fail http://127.0.0.1:9999/health || exit 1"
      interval: 5s
      timeout: 5s
      retries: 12

  admin_frontend:
    image: appflowyinc/admin_frontend:0.9.149
    restart: unless-stopped
    environment:
      - APPFLOWY_GOTRUE_BASE_URL=${APPFLOWY_BASE_URL}/gotrue
      - APPFLOWY_BASE_URL=${APPFLOWY_BASE_URL}
    depends_on:
      gotrue:
        condition: service_healthy
      appflowy_cloud:
        condition: service_started

  appflowy_web:
    image: appflowyinc/appflowy_web:0.9.132
    restart: unless-stopped
    environment:
      - APPFLOWY_BASE_URL=${APPFLOWY_BASE_URL}
      - APPFLOWY_GOTRUE_BASE_URL=${APPFLOWY_BASE_URL}/gotrue
      - APPFLOWY_WS_BASE_URL=${APPFLOWY_BASE_URL}/ws/v2
    depends_on:
      - appflowy_cloud

  ai:
    image: appflowyinc/appflowy_ai:0.9.149
    restart: unless-stopped
    environment:
      - OPENAI_API_KEY=${OPENAI_API_KEY:-}
      - AI_SERVER_PORT=5001
      - DEFAULT_AI_MODEL=gpt-4.1-mini
      - DEFAULT_AI_COMPLETION_MODEL=gpt-4.1-mini
      - AI_APPFLOWY_HOST=http://appflowy_web:3000
      - APPFLOWY_GOTRUE_JWT_SECRET=${JWT_SECRET}
      - AZURE_OPENAI_API_KEY=${AZURE_OPENAI_API_KEY:-}
      - AZURE_OPENAI_ENDPOINT=${AZURE_OPENAI_ENDPOINT:-}
      - AZURE_OPENAI_API_VERSION=${AZURE_OPENAI_API_VERSION:-}
      - APPFLOWY_S3_ACCESS_KEY=${MINIO_USER}
      - APPFLOWY_S3_SECRET_KEY=${MINIO_PASSWORD}
      - APPFLOWY_S3_BUCKET=appflowy
      - APPFLOWY_S3_REGION=us-east-1
      - AI_DATABASE_URL=postgres://${POSTGRES_USER}:${POSTGRES_PASSWORD}@postgres:5432/${POSTGRES_DB}
      - AI_REDIS_URL=redis://redis:6379
      - AI_USE_MINIO=true
      - AI_MINIO_URL=http://minio:9000
    depends_on:
      postgres:
        condition: service_healthy

  appflowy_worker:
    image: appflowyinc/appflowy_worker:0.9.149
    restart: unless-stopped
    environment:
      - RUST_LOG=info
      - APPFLOWY_ENVIRONMENT=production
      - APPFLOWY_WORKER_ENVIRONMENT=production
      - APPFLOWY_WORKER_REDIS_URL=redis://redis:6379
      - APPFLOWY_WORKER_DATABASE_URL=postgres://${POSTGRES_USER}:${POSTGRES_PASSWORD}@postgres:5432/${POSTGRES_DB}
      - APPFLOWY_WORKER_DATABASE_NAME=${POSTGRES_DB}
      - APPFLOWY_WORKER_IMPORT_TICK_INTERVAL=30
      - APPFLOWY_S3_USE_MINIO=true
      - APPFLOWY_S3_MINIO_URL=http://minio:9000
      - APPFLOWY_S3_ACCESS_KEY=${MINIO_USER}
      - APPFLOWY_S3_SECRET_KEY=${MINIO_PASSWORD}
      - APPFLOWY_S3_BUCKET=appflowy
      - APPFLOWY_S3_REGION=us-east-1
      - APPFLOWY_MAILER_SMTP_HOST=${SMTP_HOST:-smtp.gmail.com}
      - APPFLOWY_MAILER_SMTP_PORT=${SMTP_PORT:-587}
      - APPFLOWY_MAILER_SMTP_USERNAME=${SMTP_USER:-notify@appflowy.io}
      - APPFLOWY_MAILER_SMTP_EMAIL=${SMTP_USER:-notify@appflowy.io}
      - APPFLOWY_MAILER_SMTP_PASSWORD=${SMTP_PASS:-email_sender_password}
      - APPFLOWY_MAILER_SMTP_TLS_KIND=none
    depends_on:
      postgres:
        condition: service_healthy
      redis:
        condition: service_started

  minio:
    image: minio/minio:RELEASE.2025-09-07T16-13-09Z
    restart: unless-stopped
    environment:
      - MINIO_ROOT_USER=${MINIO_USER}
      - MINIO_ROOT_PASSWORD=${MINIO_PASSWORD}
    command: server /data --console-address ":9001"
    healthcheck:
      test: ["CMD", "curl", "-f", "http://localhost:9000/minio/health/live"]
      interval: 30s
      timeout: 20s
      retries: 3
    volumes:
      - minio_data:/data

  postgres:
    image: pgvector/pgvector:pg16
    restart: unless-stopped
    environment:
      - POSTGRES_USER=${POSTGRES_USER}
      - POSTGRES_DB=${POSTGRES_DB}
      - POSTGRES_PASSWORD=${POSTGRES_PASSWORD}
      - POSTGRES_HOST=postgres
    volumes:
      - postgres_data:/var/lib/postgresql/data
    healthcheck:
      test: ["CMD", "pg_isready", "-U", "${POSTGRES_USER}", "-d", "${POSTGRES_DB}"]
      interval: 5s
      timeout: 5s
      retries: 12

  redis:
    image: redis:8.2.2-alpine3.22
    restart: unless-stopped
    volumes:
      - redis_data:/data
    healthcheck:
      test: ["CMD-SHELL", "redis-cli -h localhost -p 6379 ping"]
      interval: 5s
      timeout: 5s
      retries: 3

volumes:
  minio_data:
  postgres_data:
  redis_data:
The image versions above were current at time of writing. Check Docker Hub for the latest stable AppFlowy versions.
Now start all services:
cd /opt/appflowy
sudo docker compose up -d
This pulls all images and starts the full AppFlowy Cloud stack. The first startup takes a few minutes while PostgreSQL initializes and all health checks pass. You can monitor progress with:
sudo docker compose logs -f
Wait until you see healthy status from the main services before proceeding. You can check with:
sudo docker compose ps
Step 7: Access Your Self-Hosted AppFlowy Instance
Once all services are running, your AppFlowy admin console should be available at https://yourdomain.com/console. If you're using a temporary HTTP setup, open http://your-server-ip:8080/console.
Log into the admin panel with the credentials you set in your .env file:
- Email: The
ADMIN_EMAILvalue (default:admin@example.com) - Password: The
ADMIN_PASSWORDvalue you configured
To use AppFlowy as a workspace, download the AppFlowy desktop or mobile app and point it to your self-hosted server URL (https://yourdomain.com) during setup.
Heads up: On the free self-hosted tier, creating a second non-admin user can look like it works in GoTrue, but that user will fail the AppFlowy login with
User not found. That is the 1-user limit showing up. Add an AppFlowy self-hosted license before inviting real team members.
Security Recommendations
Running a public server means you should take security seriously:
- Use strong, unique passwords for all services in your
.envfile. - HTTPS is already handled automatically by Caddy via Let's Encrypt.
- Regularly apply system updates and security patches with
sudo apt-get update && sudo apt-get upgrade -y. - Review your firewall configuration periodically with
sudo ufw status verbose. - Set up regular backups of your PostgreSQL database and MinIO object storage. Check out our guide on backing up and restoring Postgres via SSH tunnel for more details.
- Install tools like Fail2ban for extra brute-force protection.
Updating Your AppFlowy Installation
When you want to update AppFlowy, first check Docker Hub for the latest image versions. Update the version tags in your compose.yml file, then run:
cd /opt/appflowy
sudo docker compose pull
sudo docker compose up -d
Docker will download the updated images and replace your current containers. Your data is stored in Docker volumes, so it persists across updates.
Cost Comparison with Other Providers
AppFlowy Cloud runs multiple services and benefits from a server with at least 4 GB RAM:
| Provider | vCPU Cores | RAM | Disk | Estimated Monthly Cost | Notes |
|---|---|---|---|---|---|
| Sliplane | 4 | 8 GB | 160 GB | €44 | charge per server |
| Render | 4 | 8 GB | 80 GB | ~$85–$120 | Pro plan required |
| Fly.io | 4 | 8 GB | 40 GB | ~$60–$80 | VM + volumes |
| Railway | 4 | 8 GB | 40 GB | ~$50–$100 | Usage-based |
Conclusion
You now have a fully self-hosted AppFlowy Cloud instance running on Hetzner with Docker, automatic HTTPS via Caddy, and all the supporting services for your workspace. Connect with the desktop or mobile app and start organizing your projects with full data ownership. If you plan to add real team members, budget for an AppFlowy self-hosted license.