The Ultimate n8n Self-Hosting Guide
 Jonas Scholz
Tired of handing over your automation infrastructure (and wallet) to SaaS platforms? Want full control without vendor lock in? Good. This guide will show you how to self host n8n, the open source Zapier alternative, on your own server including reverse proxy, SSL, backups, monitoring, and even cost comparisons.
Quick Answer
- You can self-host n8n on Ubuntu with Docker, Caddy, PostgreSQL, and S3-compatible backups.
- Use pinned Docker images for production. Avoid
latestunless you are intentionally testing. - A raw VPS is usually €4-€15/month, but you own updates, security, backups, and restores.
- Sliplane is the faster route if you want the same self-hosted n8n container with HTTPS, logs, persistent storage, backups, and no server maintenance.
- Updated: 2026
DIY vs Sliplane
| Route | Cost | Setup time | Maintenance | Best for |
|---|---|---|---|---|
| Raw VPS | €4-€15/month | 2-4 hours | High | Developers who want to own every layer |
| Sliplane | From €9/month | Minutes | Low | Builders who want managed self-hosting |
| n8n Cloud | From €20/month billed annually | Minutes | Low | Teams that prefer official SaaS and execution-based pricing |
0. Your Server
Server Requirements
For running n8n, I'd recommend a server with:
- CPU: At least 2 vCPUs (dedicated cores preferred)
- RAM: Minimum 4GB, recommended 8GB
- Storage: At least 40GB SSD
Can you do with less? Absolutely. But when hardware is so cheap, especially compared to the cloud version of n8n, I'd prefer having a bit more power and sleeping well at night :)
Recommended Provider
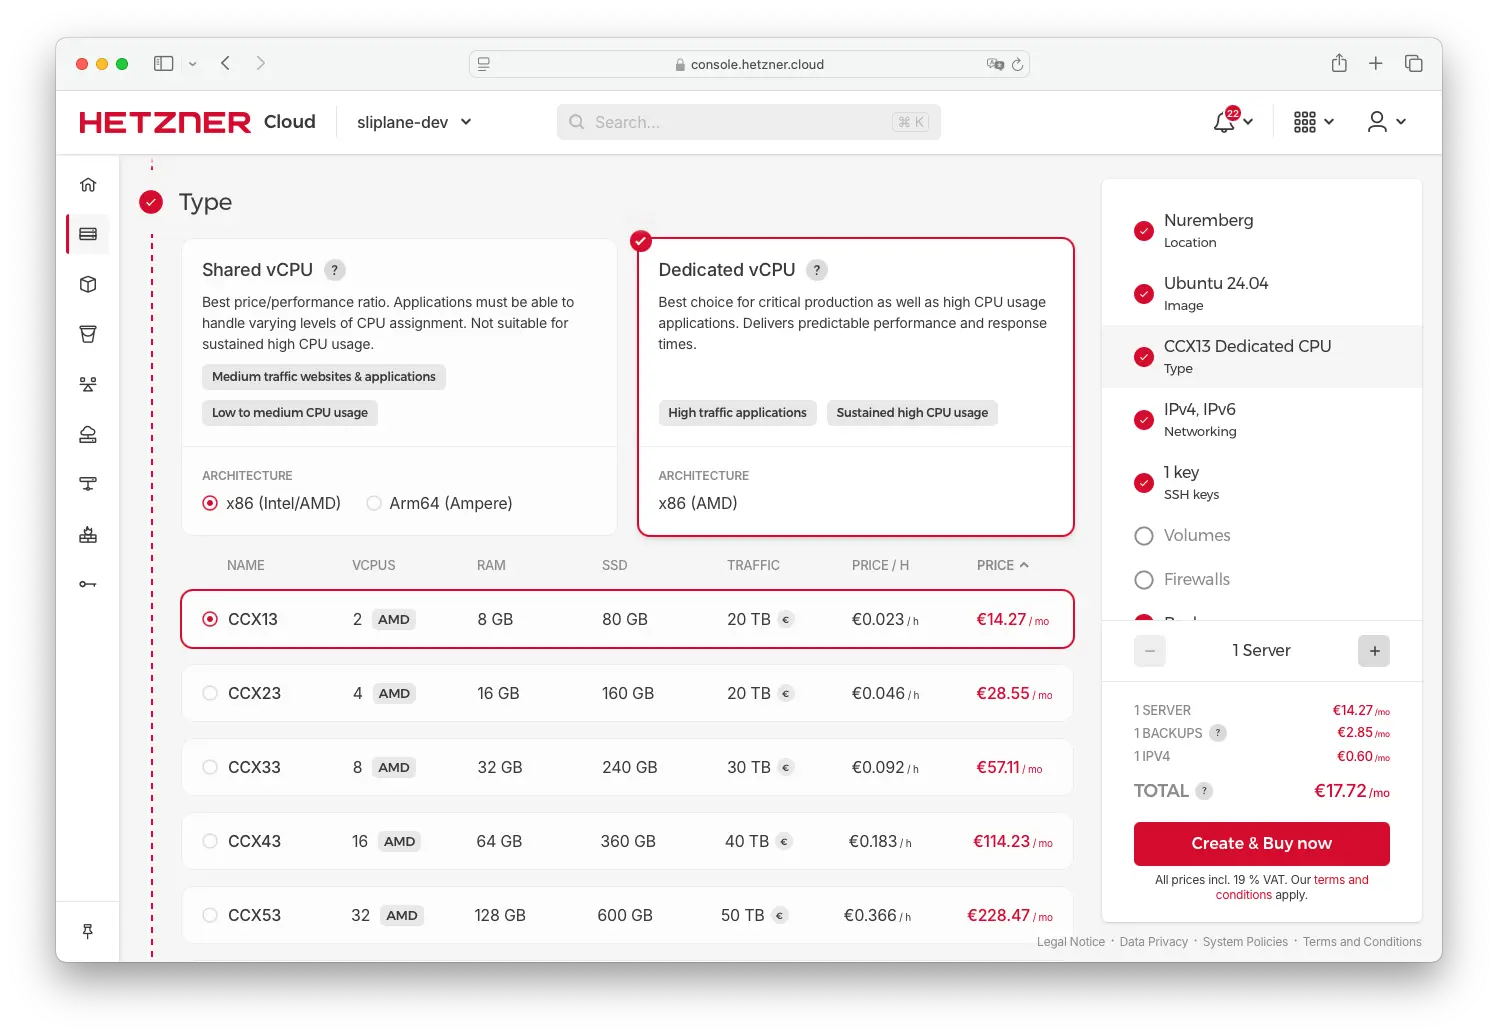
I recommend using Hetzner Cloud (referral gets you €20: link). Their CCX13 plan is perfect for n8n:
- 2 dedicated vCPU
- 8 GB RAM
- 80 GB SSD
- 20 TB traffic
- €14.27 per month
You could also use a shared CPU server, but that would mean roughly half the performance, and most importantly, less predictable performance. In my experience the dedicated ones are just easier to use longterm.
Server Setup
- Create a new server:
- Choose Ubuntu 24.04 LTS
- Select the CCX13 plan
- Enable both IPv4 and IPv6
- Add your SSH key for secure access
- Enable automated backups (recommended)
- Initial Server Configuration:
Login with ssh -i ~/.ssh/your-key root@<your-ip>
# Update system packages
sudo apt update
sudo apt upgrade -y

# Install Docker
curl -fsSL https://get.docker.com -o get-docker.sh
sudo sh get-docker.sh

# Add your user to the docker group
sudo usermod -aG docker $USER

# Install Docker Compose
sudo apt install docker-compose-plugin

# Verify installations
docker --version
docker compose version
- Security Best Practices:
- Set up a firewall (we'll configure this in the next section)
- Disable root login
- Set up fail2ban for SSH protection
- System Optimization:
# Set up swap space (if not already configured)
sudo fallocate -l 4G /swapfile
sudo chmod 600 /swapfile
sudo mkswap /swapfile
sudo swapon /swapfile
echo '/swapfile none swap sw 0 0' | sudo tee -a /etc/fstab

# Optimize system settings
sudo sysctl -w vm.swappiness=10
sudo sysctl -w vm.vfs_cache_pressure=50
The server dashboard should look something like this:
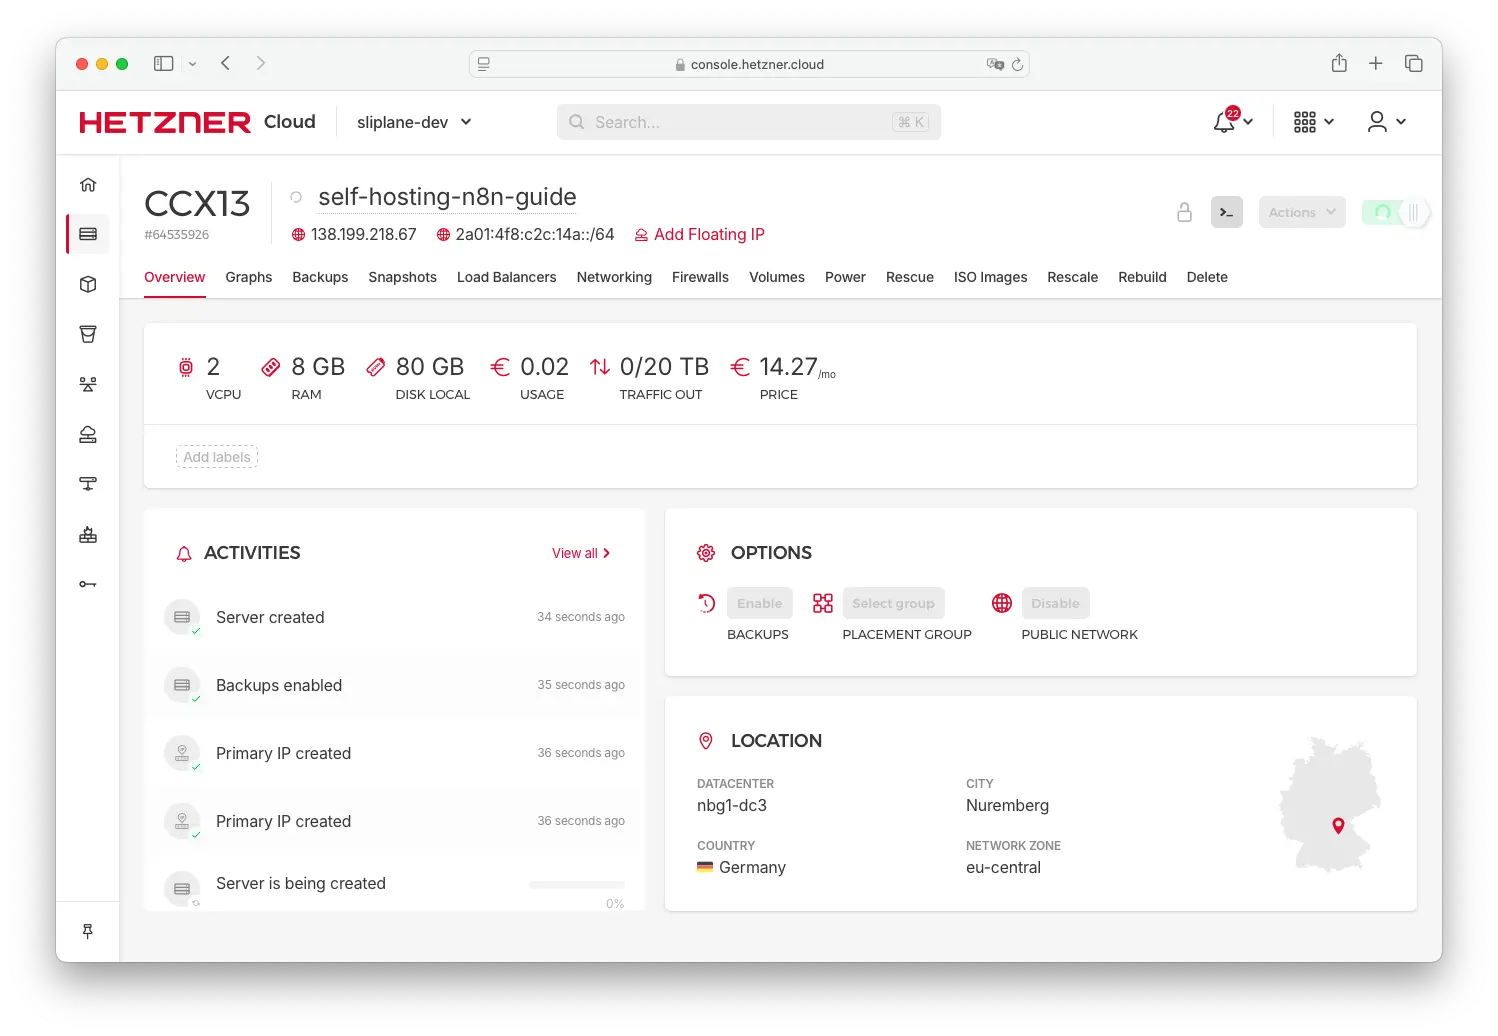
Now that your server is ready, let's move on to setting up the firewall and security measures.
1. Firewall
The firewall is a crucial part of your server's security. It's the first line of defense against unauthorized access and should block all ports except the ones you need.
Allow only the following ports:
- Port 22 (SSH), so you can still access your server
- Port 80 (HTTP), we will redirect it to 443
- Port 443 (HTTPS), so you can access n8n over HTTPS!
Block everything else. Do not expose n8n directly. Put it behind Caddy (reverse proxy)
In Hetzner that would look like this:
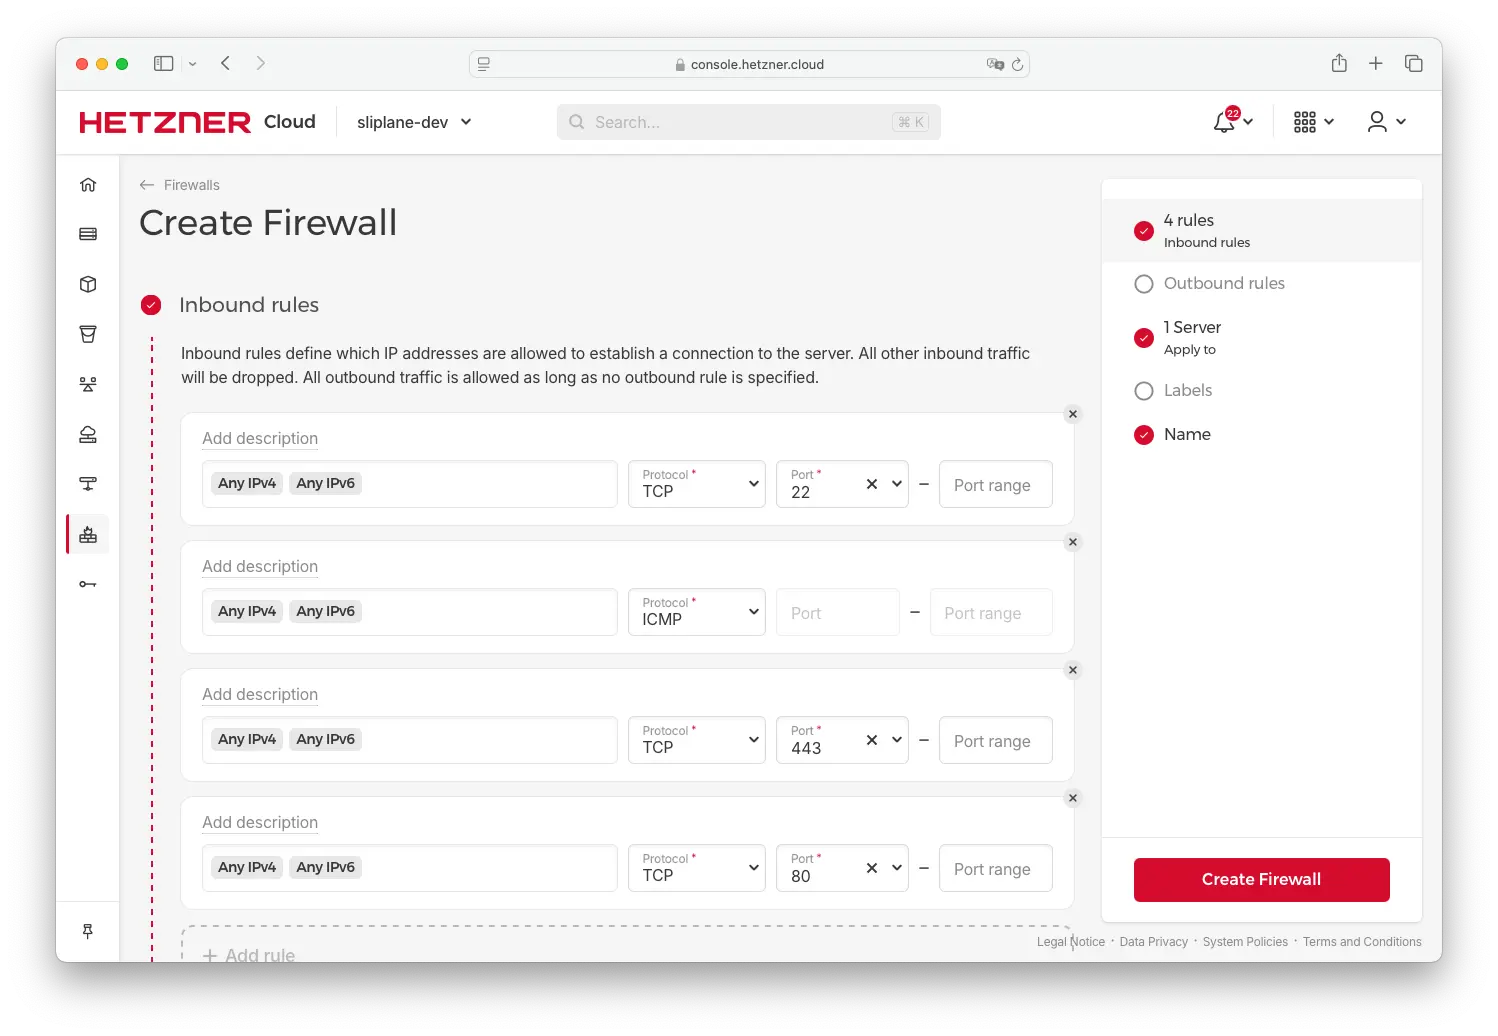
If you don't use Hetzner, it's very likely that you can find a similar setup in your provider's dashboard.
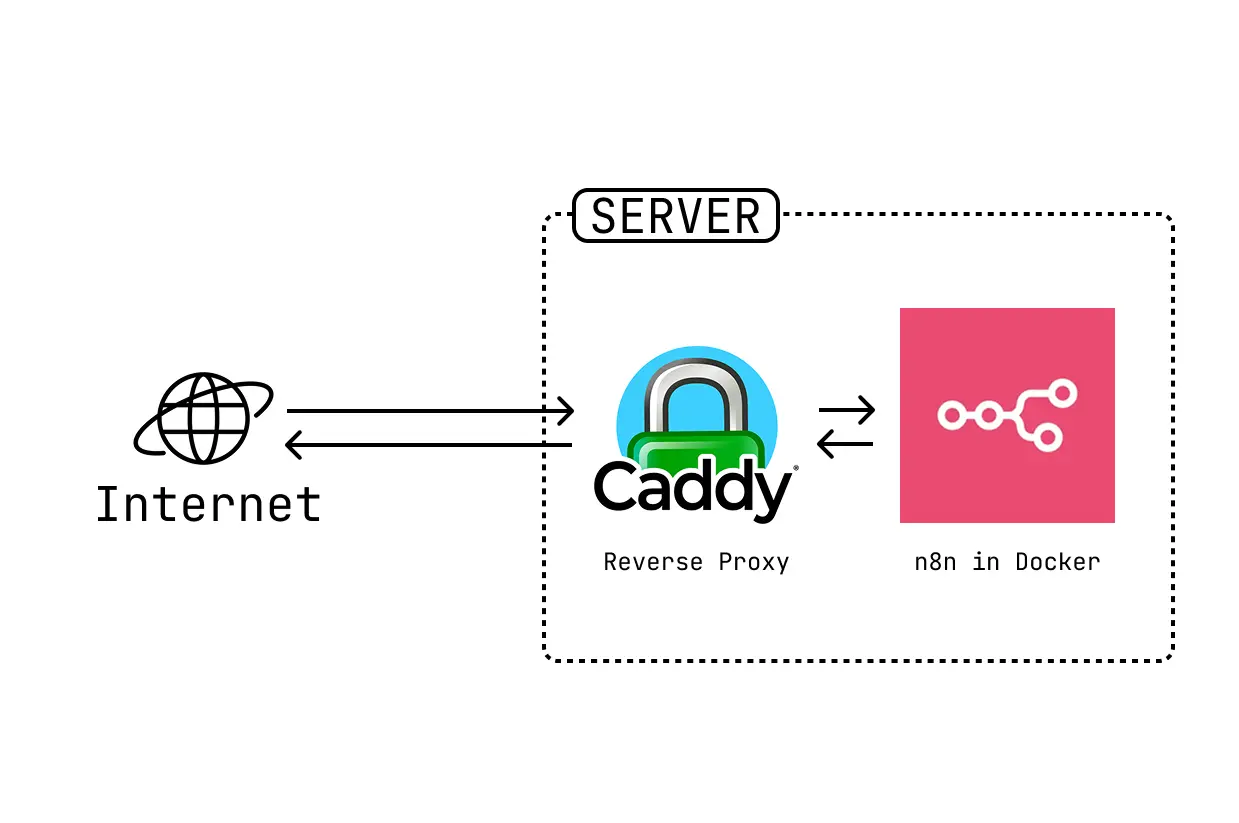
2. Caddy (Reverse Proxy with HTTPS)
A reverse proxy is another application that sits in front of n8n, handles the creation of SSL certificates and redirects HTTP to HTTPS. There are many reverse proxies out there, but we will use Caddy for this guide.
Why Caddy?
- Handles HTTPS automatically (Let's Encrypt)
- Super simple config
- Works great with Docker
You'll need
- A domain (e.g.,
n8n.yourdomain.com) - DNS A and AAAA records pointing to your server IP
Caddy Docker Compose
services:
  caddy:
    image: caddy
    container_name: caddy
    restart: unless_stopped
    ports:
      - 80:80
      - 443:443
    volumes:
      - ./data:/data
      - ./config:/config
      - ./Caddyfile:/etc/caddy/Caddyfile:ro
Caddyfile
n8n.yourdomain.com {
  reverse_proxy n8n:5678
}
3. PostgreSQL (Database)
n8n works best with PostgreSQL
services:
  postgres:
    image: postgres:16.4
    restart: unless_stopped
    volumes:
      - postgres_data:/var/lib/postgresql/data
    environment:
      - POSTGRES_PASSWORD=change_this
      - POSTGRES_USER=n8n_user
      - POSTGRES_DB=n8n
volumes:
  postgres_data:
4. n8n (Finally)
services:
  n8n:
    image: docker.io/n8nio/n8n:2.29.10
    restart: always
    environment:
      - DB_TYPE=postgresdb
      - DB_POSTGRESDB_DATABASE=n8n
      - DB_POSTGRESDB_HOST=postgres
      - DB_POSTGRESDB_PORT=5432
      - DB_POSTGRESDB_USER=n8n_user
      - DB_POSTGRESDB_PASSWORD=change_this
      - WEBHOOK_URL=https://n8n.yourdomain.com/
    volumes:
      - n8n_data:/home/node/.n8n
  caddy:
    # same config as before
volumes:
  n8n_data:
Make sure your WEBHOOK_URL matches the domain in your Caddyfile. n8nio/n8n:2.29.10 was the current stable image when this guide was refreshed in 2026; before production updates, check the n8n Docker tags and pin an exact version after testing.
5. Backups (Do Not Skip)
Disk backups are not enough
Use something like docker-volume-backup to upload backups to an S3 compatible provider (like Sliplane Object Storage, Cloudflare R2, Wasabi, or Backblaze B2)
services:
  backup:
    image: offen/docker-volume-backup:v2
    environment:
      AWS_ENDPOINT: your.r2.endpoint
      AWS_S3_BUCKET_NAME: backup_bucket
      AWS_ACCESS_KEY_ID: your_key
      AWS_SECRET_ACCESS_KEY: your_secret
    volumes:
      - n8n_data:/backup/n8n:ro
      - /var/run/docker.sock:/var/run/docker.sock:ro
You can back up daily, weekly, whatever fits
6. Cloudflare (Free CDN and Security)
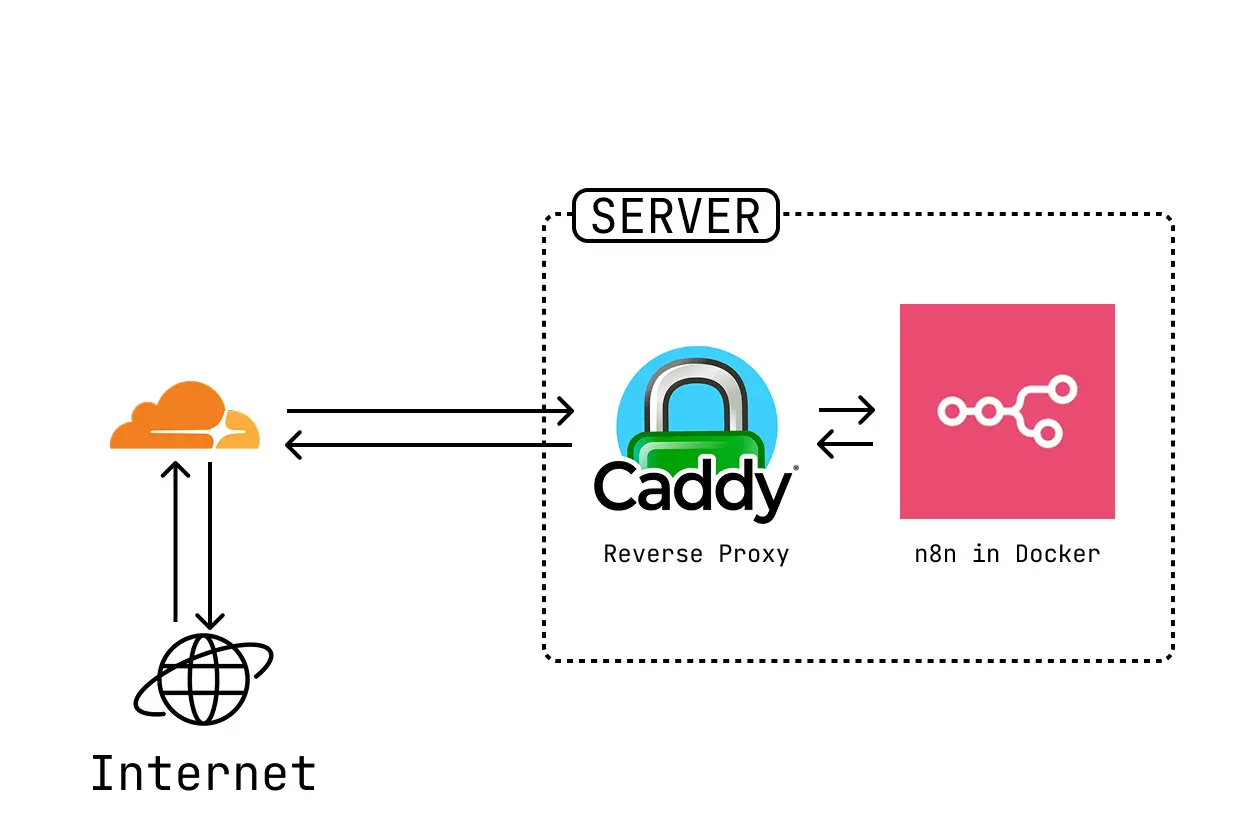
Right now we are directly exposing n8n to the internet. This is usually fine, but if you want to sleep better at night, you can use Cloudflare to
- Protect against DDoS
- Cache static content
- Restrict access (IP whitelisting, rate limiting)
How can we do that?
- Add your domain to Cloudflare
- Set A and AAAA records to your server
- Disable proxy (gray cloud), let Caddy fetch the certificate
- Re enable proxy (orange cloud) after TLS is working

7. Monitoring (Grafana and Alerts)
Monitoring is optional but highly recommended. You want to know when things break before your users do
You can either
- Use Grafana Cloud (free tier is enough)
- Self host Prometheus, Grafana, and node_exporter
I recommend starting with Grafana Cloud for simplicity
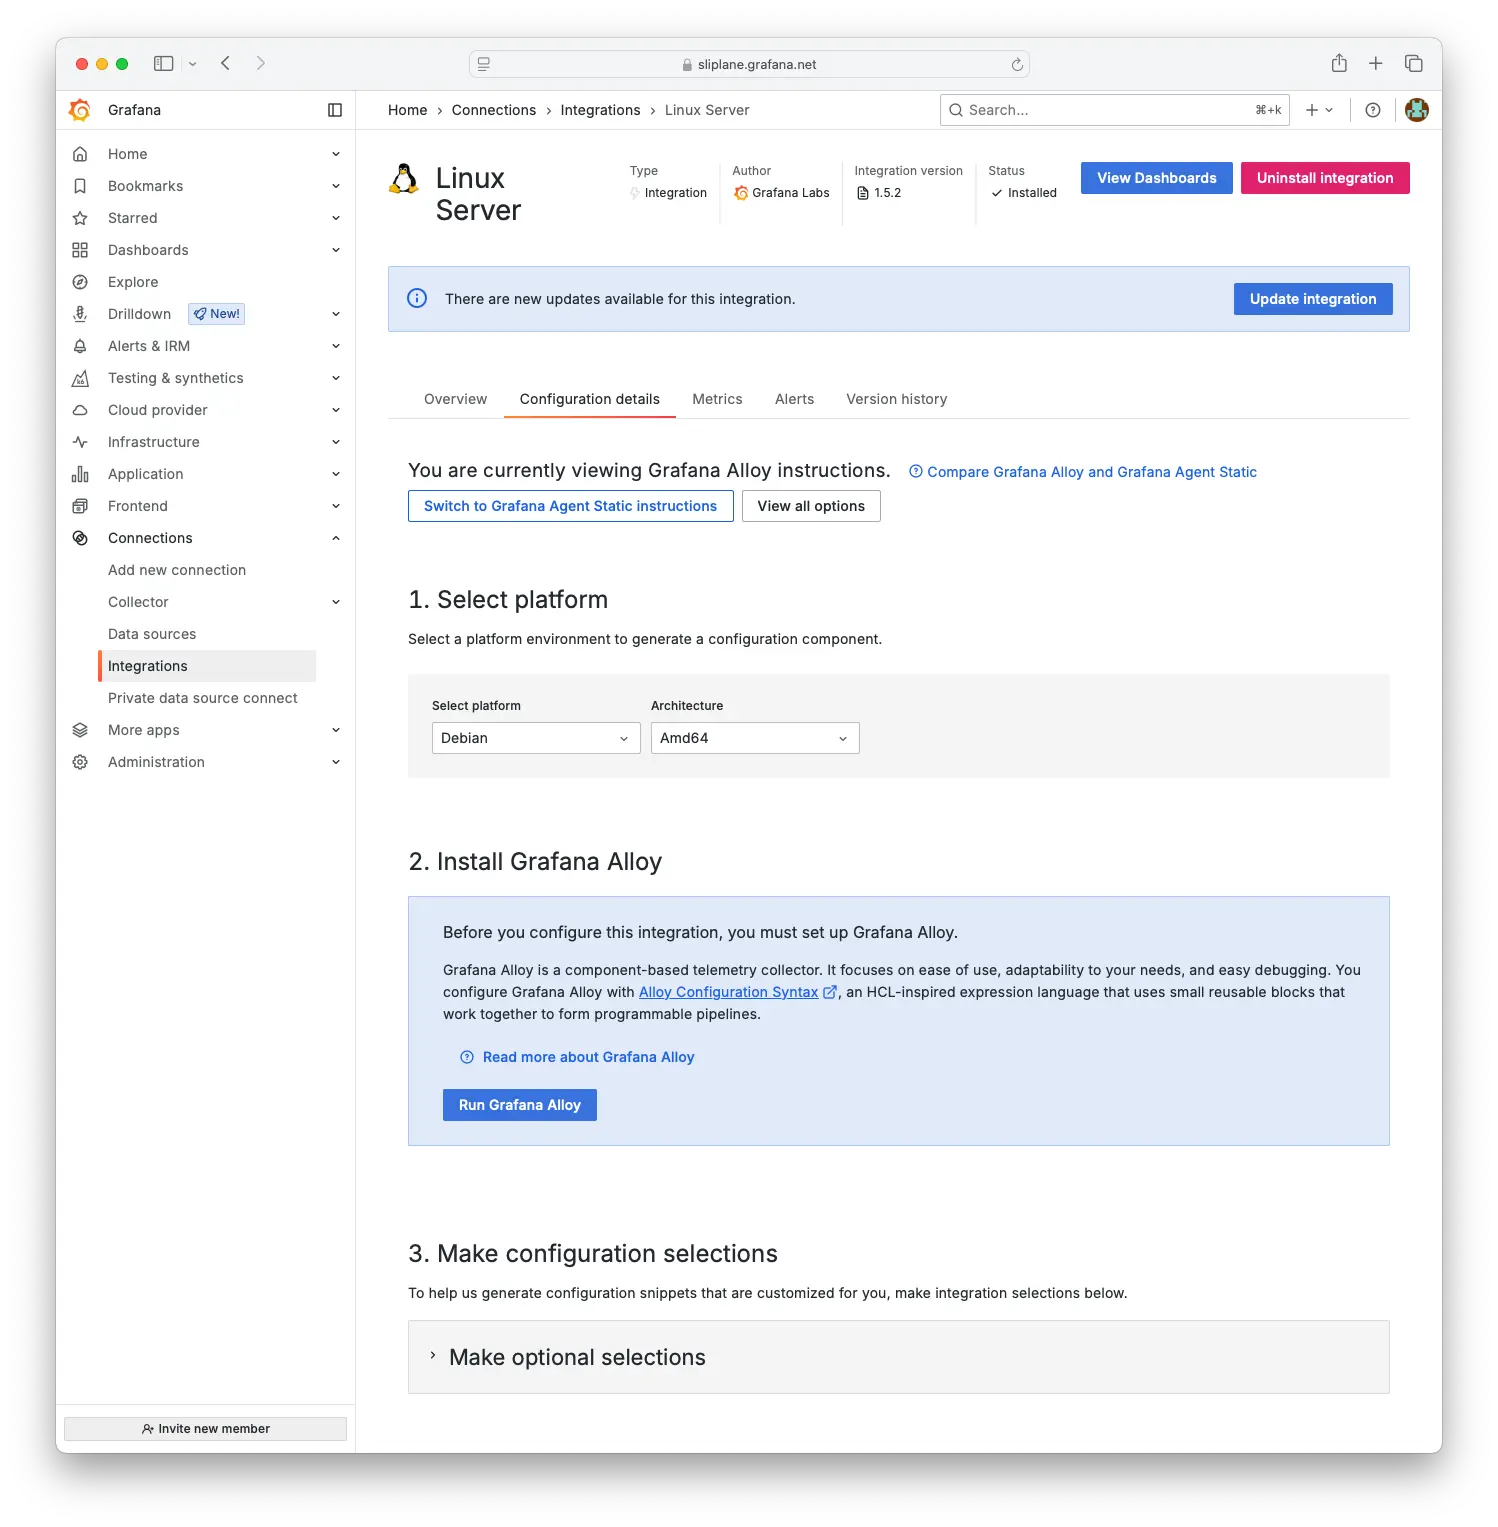
A. Basic Setup with Grafana Cloud
- Sign up at grafana.com
- Create a Grafana Cloud stack
- Add Grafana Agent to your server
Follow the "Linux server integration" instructions they provide. You'll basically:
- Install the Grafana Agent
- Copy and paste their pre generated config
- Start it with systemd or Docker
That's it. You'll get dashboards like this out of the box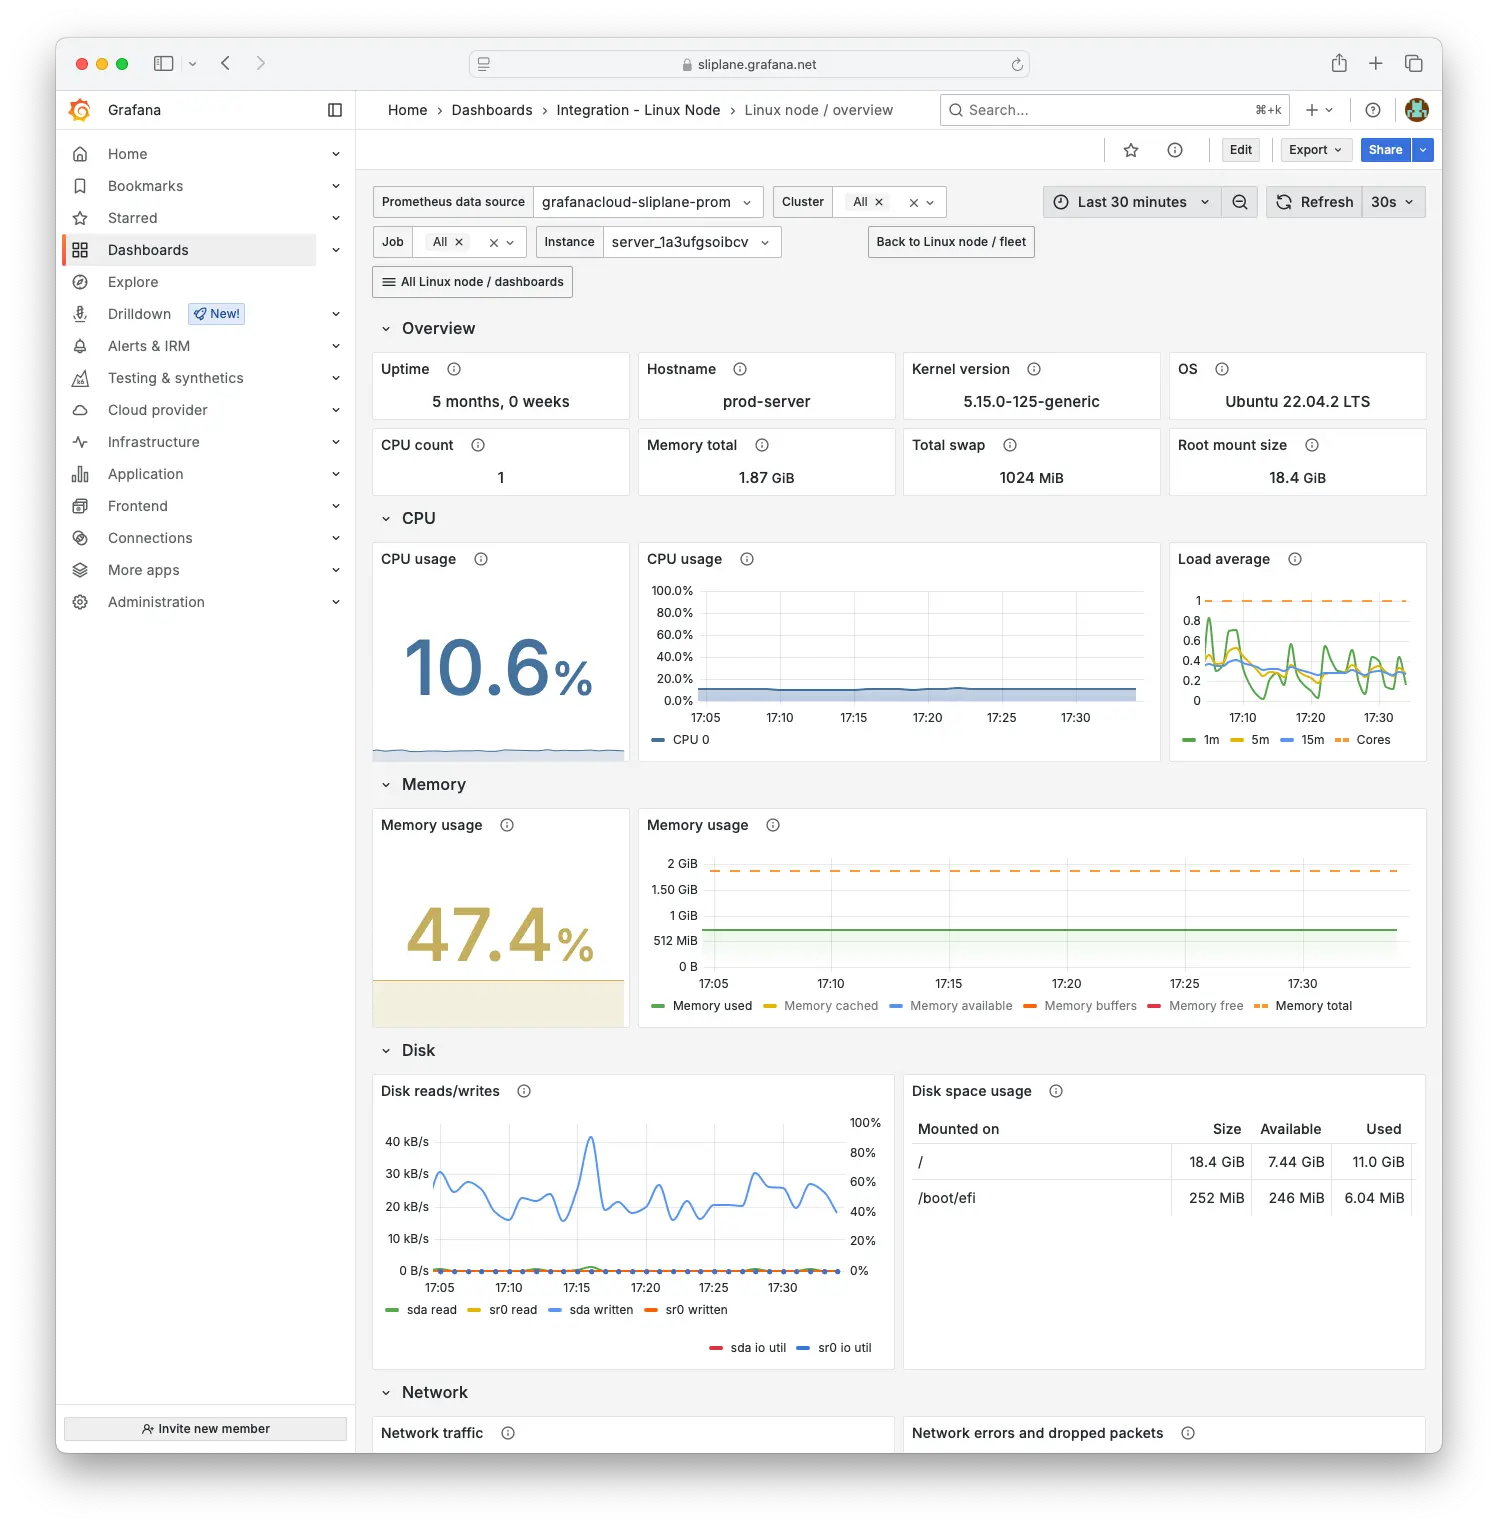
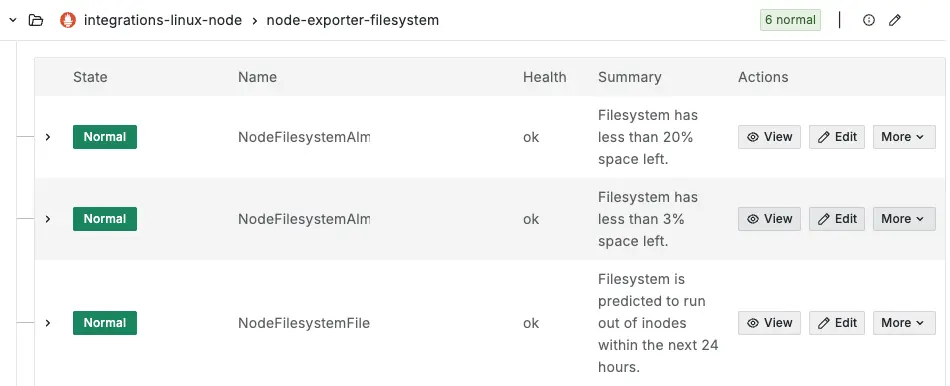
B. Custom Alerts
Once data flows into Grafana, you can configure alerts
Recommended alerts
- Disk usage over 90 percent
- CPU load over 90 percent for more than 5 minutes
- RAM usage over 90 percent
- Docker container down
- n8n not responding on port 5678
- Backup job hasn't run in 24 hours
Grafana can send alerts via
- Slack
- Discord
- Webhooks (e.g., to n8n itself, but thats probably not very smart
)
Total Cost Breakdown
| Item | Price per month |
|---|---|
| Hetzner CCX13 | €14.27 |
| Backup (R2 etc) | ~€1.00 |
| DNS and Domain | ~€1.00 |
| Grafana Cloud Free | €0.00 |
| Total | ~€16 per month |
Compared to n8n Cloud (starts at €20 per month for 5 workflows), self hosting pays off fast
If you already have a server (e.g., for other projects), the marginal cost is even lower €1 to 2 per month
Conclusion
Self hosting n8n is
- Cheaper
- More powerful
- Surprisingly easy
You get full control over your data, integrations, and automations. No vendor limits. No hidden throttling. No recurring SaaS tax
Want more posts like this? Follow me @jonasscholz or try out Sliplane.io my platform that helps you deploy stuff like this without the headache
Let me know in the comments. Are you running n8n self hosted? Got questions or other tools you'd add?