How to use Cloudflare with self-hosted n8n
 Jonas Scholz
If you are self-hosting n8n, the powerful open source automation platform, it is a smart move to put Cloudflare in front of it.
Cloudflare provides you with:
- ✅ Free DDoS protection
- ✅ Fast global CDN caching
- ✅ Easy HTTPS via SSL
- ✅ Powerful firewall and rate limiting
- ✅ Clean DNS management
The best part is that it is free to use with your domain.
In this post, you will learn how to connect your n8n instance on Sliplane with your domain on Cloudflare. This way, your automations will be secure, reliable, and ready for production.
Why Use Cloudflare With n8n?
While n8n is powerful, it is not designed to handle DDoS attacks, traffic spikes, or aggressive bots. Cloudflare acts as a protective layer between the internet and your n8n instance.
- DDoS Protection: Cloudflare blocks malicious traffic before it reaches your server.
- Zero Downtime HTTPS: Use a free SSL certificate with automatic renewal.
- Caching and Performance: Speed up workflows by caching static content.
- Firewall Rules: Allow traffic only from specific countries, IPs, or devices.
- Rate Limiting: Prevent abuse of public webhook endpoints.
If you plan to expose n8n to the public, especially for webhooks, you should consider using Cloudflare.
What You Need
Before you start, make sure you have the following:
- A domain connected to Cloudflare
- If you purchased a domain elsewhere, you can move DNS management to Cloudflare for free
- An n8n instance running on Sliplane
- Sliplane makes it easy to self host apps like n8n without server management
Here is a 40 second video showing you how to do this:
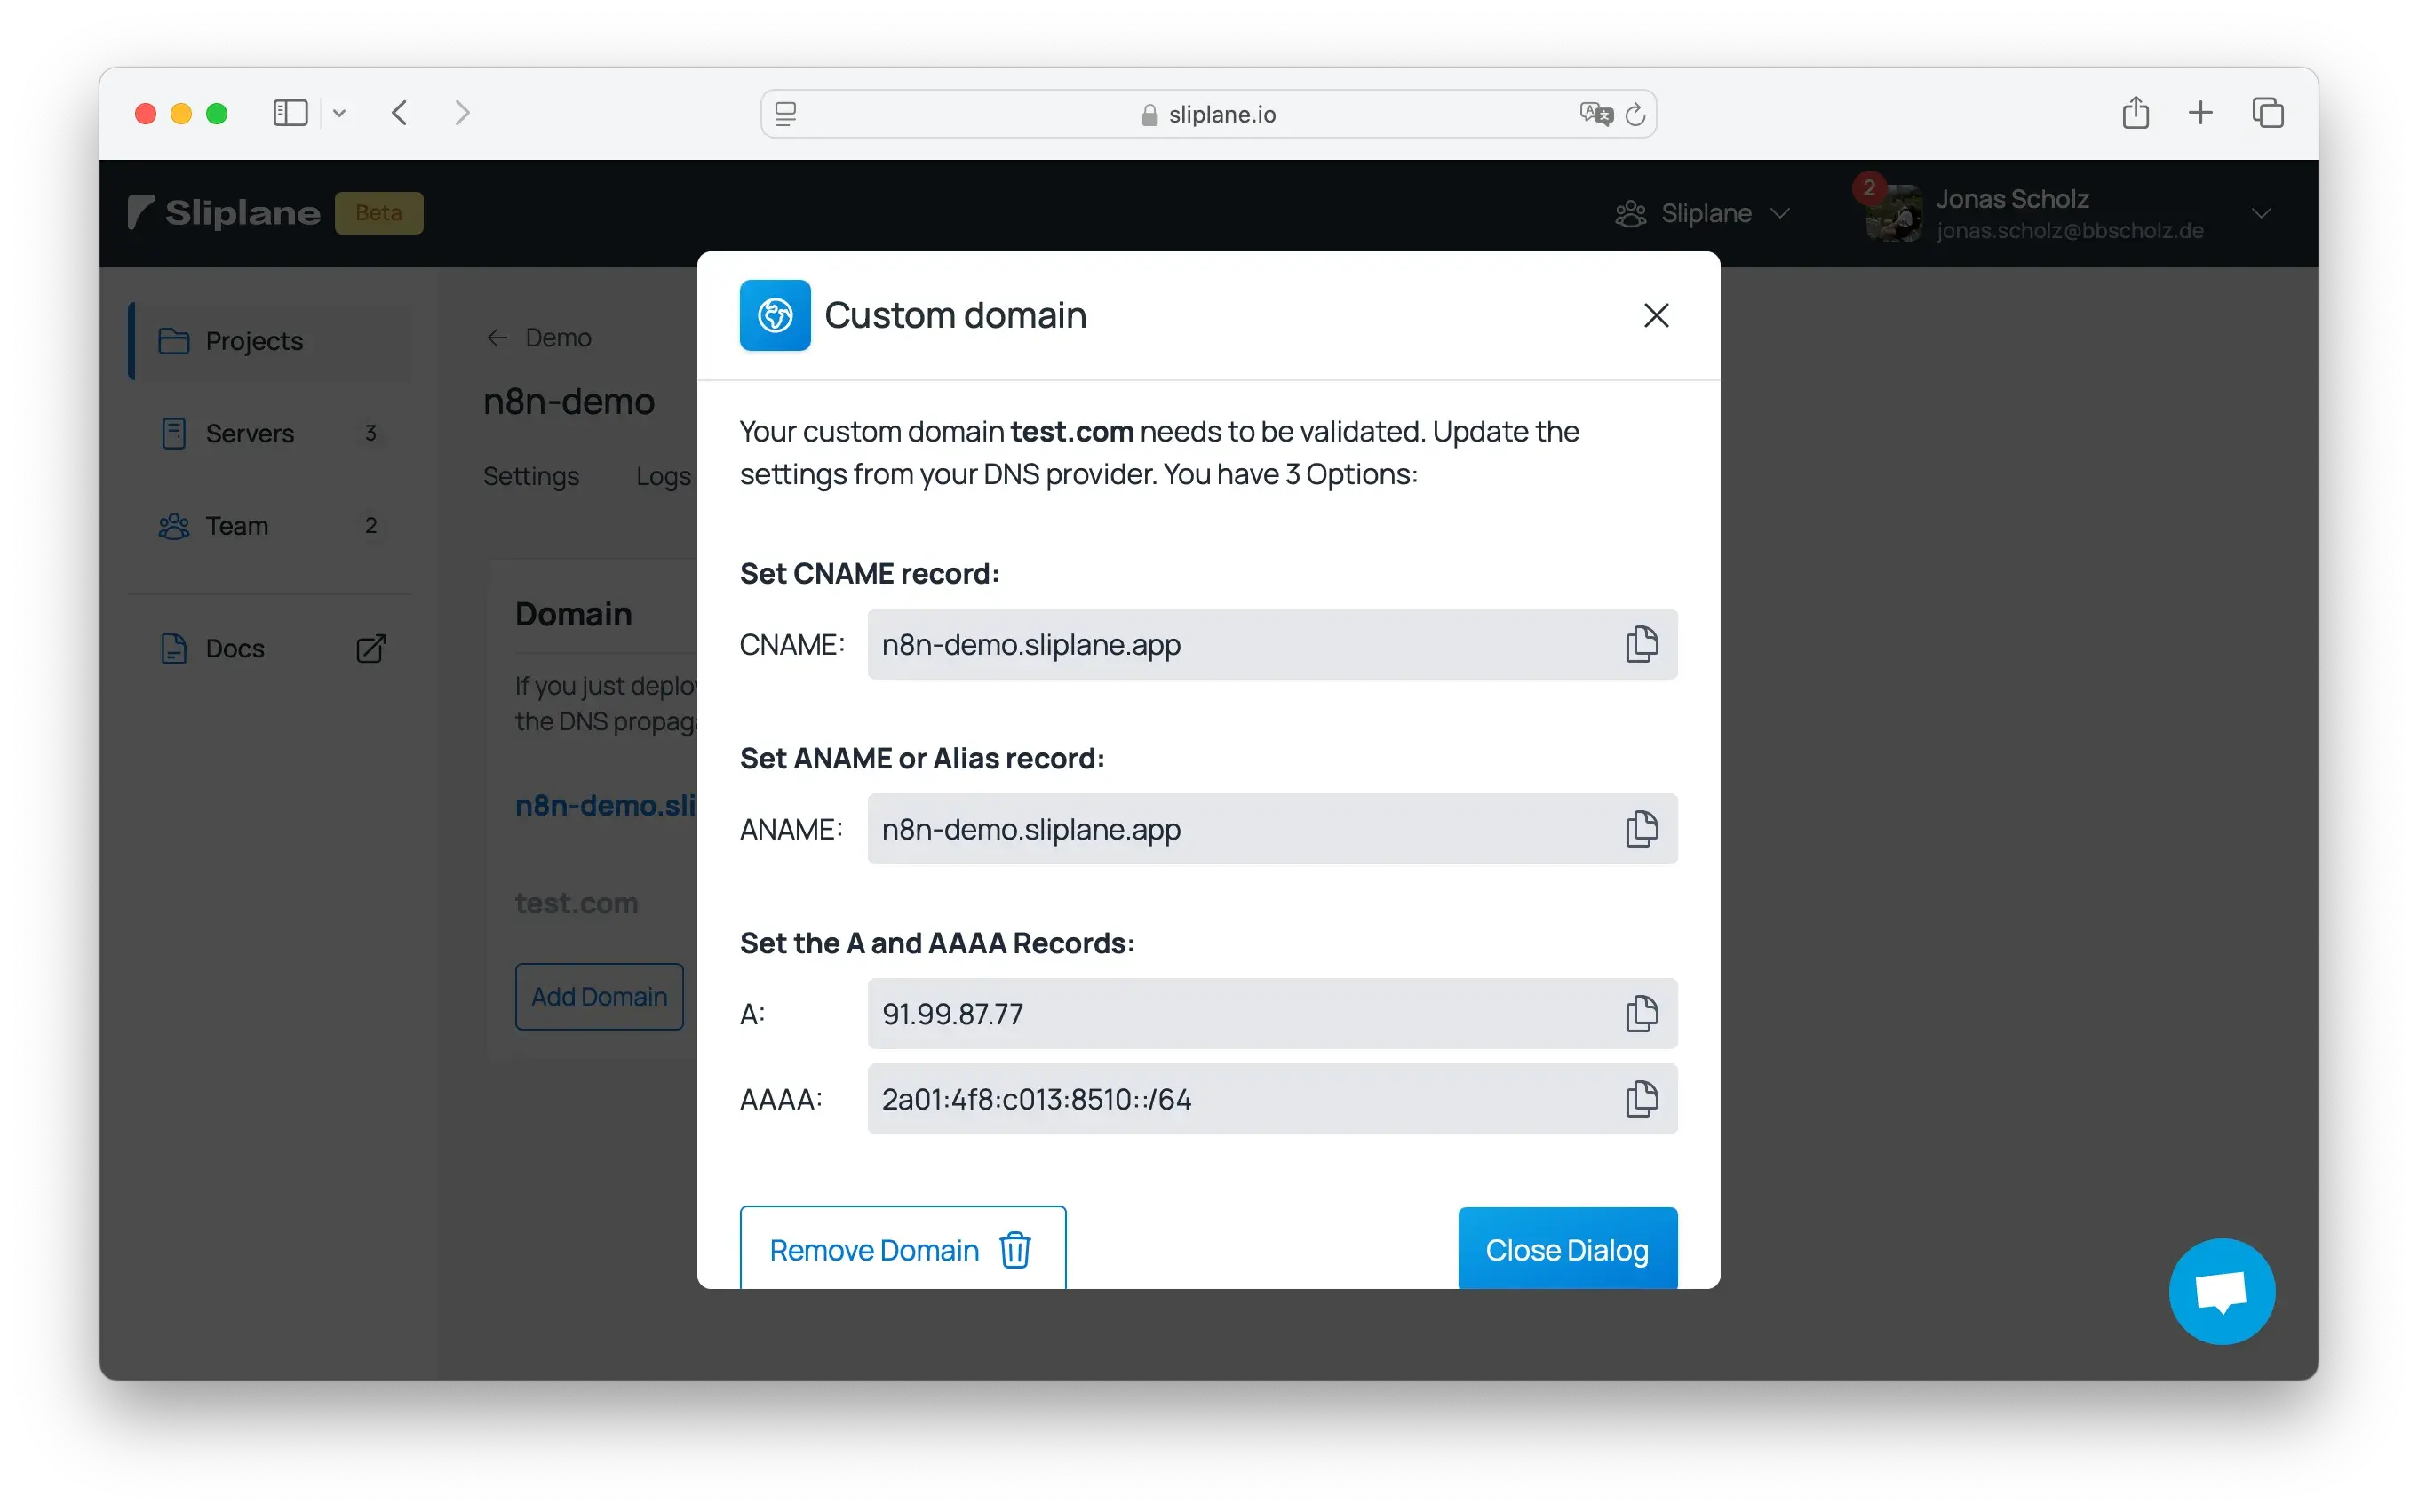
Step 1: Add Your Domain in Sliplane
- Go to your n8n service dashboard on Sliplane.
- Open the Domains tab.
- Click Add Domain.
- Enter your full domain (for example,
automation.example.com) and click Add.
Sliplane will now show the DNS settings you need. Usually, this is a CNAME record pointing to your service. Using a CNAME is recommended because it updates automatically if your server's IP changes.
Step 2: Add a CNAME Record in Cloudflare
- Go to your Cloudflare dashboard and select your domain.
- Open the DNS section.
- Click Add record:
- Type:
CNAME - Name:
@(for root) or a subdomain such asn8norautomation - Target: The CNAME value shown by Sliplane
- Type:
- Set Proxy status to DNS only (grey cloud). → You can re enable the proxy later, but keep it off for now during verification.
Step 3: Wait for Domain Verification
Sliplane will verify your domain automatically. This process usually takes less than 15 minutes.
Once your domain is verified, you can return to Cloudflare and toggle the orange cloud to enable proxying. This gives you CDN, caching, and security benefits instantly.
Step 4: Enable Full (Strict) SSL
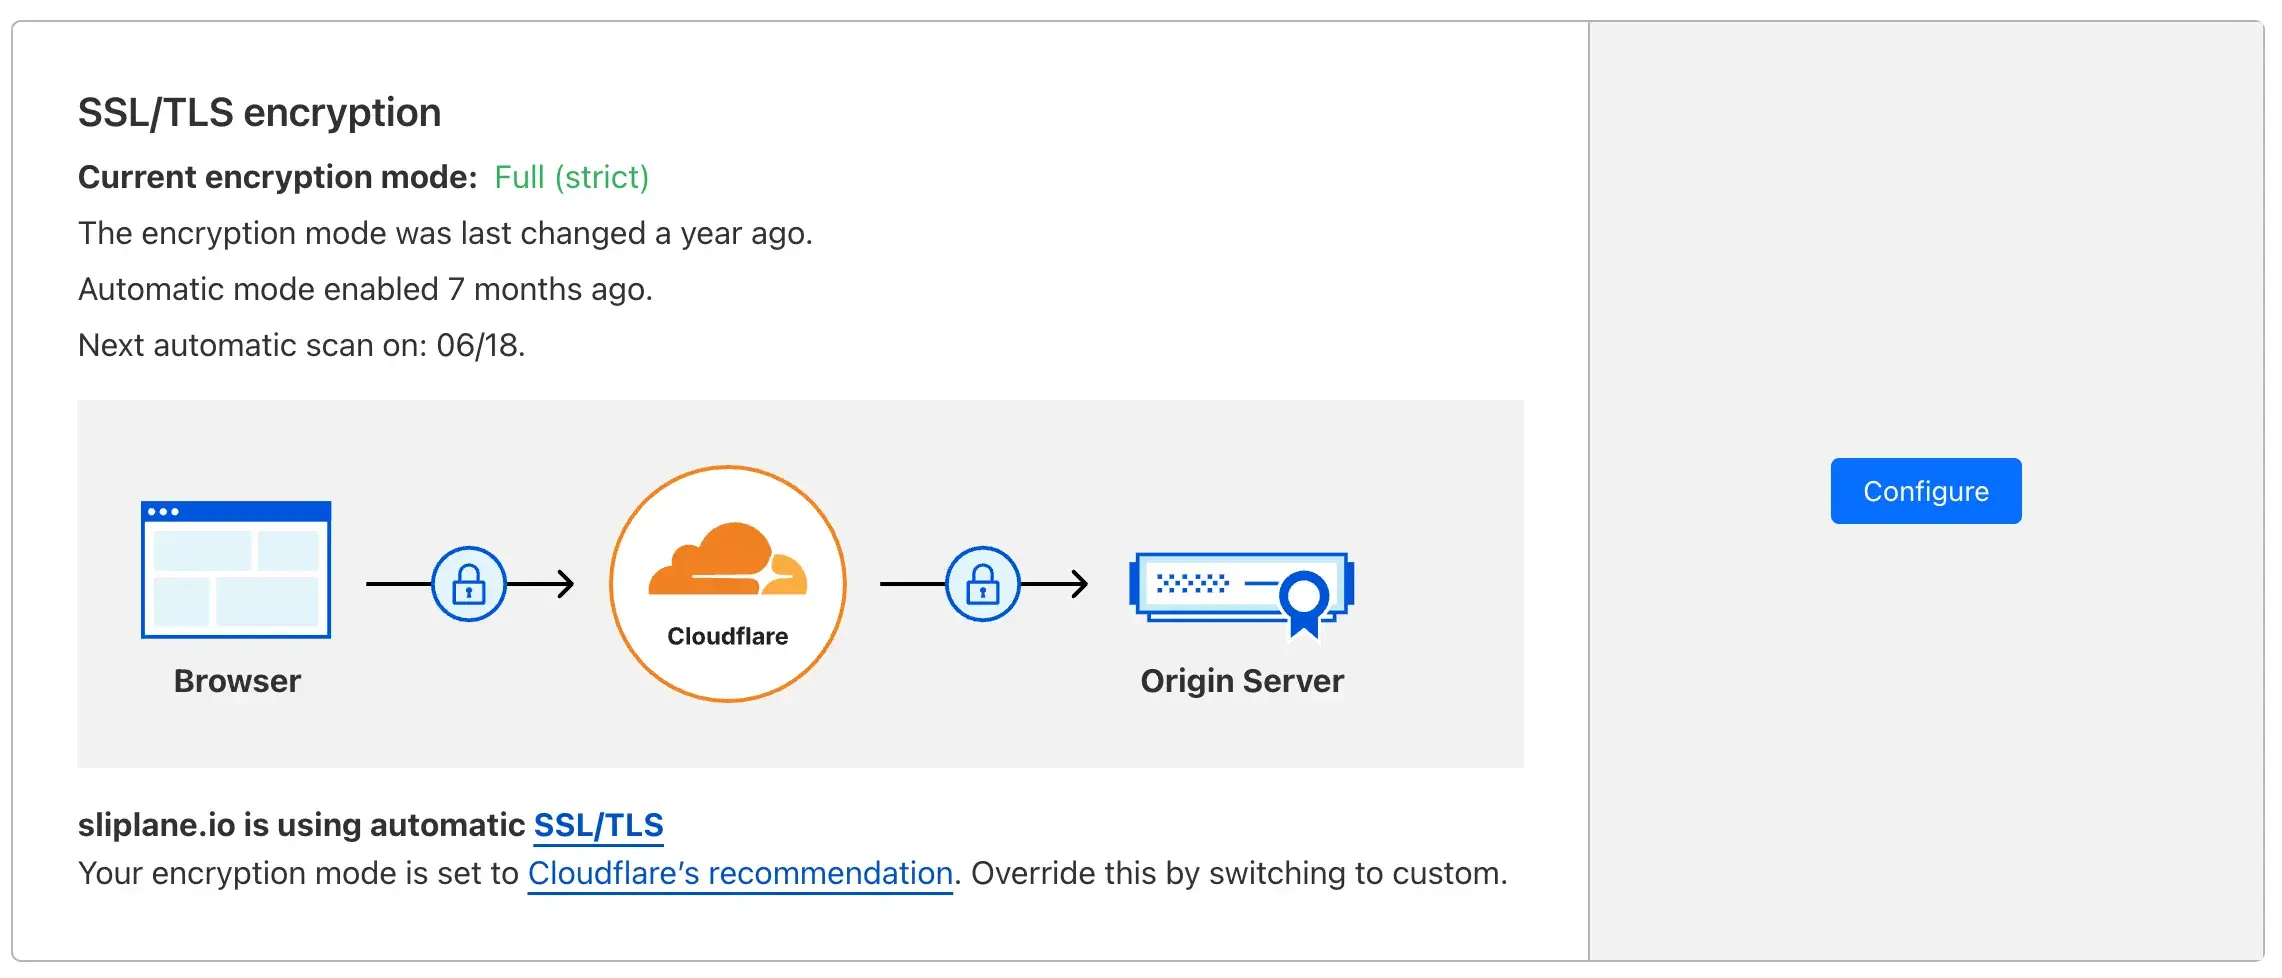
This ensures full encryption between:
- The browser and Cloudflare
- Cloudflare and your n8n instance
- In Cloudflare, go to your domain and open SSL/TLS
- Set the SSL Mode to Full (Strict)
If you do not use "Strict," your SSL might fall back to insecure modes. Sliplane handles Let's Encrypt certificates automatically, so strict mode is safe and recommended.
Bonus: Do Not Block ACME Challenge Routes
If you are using Cloudflare Firewall Rules or geo blocking, make sure to exclude the following path from blocking:
https://<your-domain>/.well-known/acme-challenge/*
This path is used for SSL certificate renewal. Blocking it can break HTTPS.
You Are Done
You have now connected your self hosted n8n instance to Cloudflare. You get:
- Free HTTPS
- Improved security
- Better reliability
- Easier domain management
If you are using Sliplane, this entire setup takes just a few minutes. Now you can build powerful workflows with peace of mind 🚀